Gaming on a VM using a Lenovo Legion 7, Arch Linux, and VFIO Passthrough
Instructions on how to create a gaming virtual machine on the Legion 7 (2021) using VFIO.

Although Linux is not "officially" a gaming platform and is rarely supported by AAA game developers, there are many different ways to play games on it. The most common method is using a compatibility layer such as Wine/Proton/DXVK, however, most anti-cheat solutions don't work on such a layer.
This is where VFIO passthrough comes in. Given that you have compatible hardware, it is possible to have a VM of any OS with a dedicated GPU and near-native performance. Luckily, Lenovo's Legion 7 (2021) has the perfect hardware setup for such a project.
In this post, I will give detailed instructions on how to create a Windows gaming virtual machine on the Legion 7 (2021) which hijacks the system's dedicated GPU when it boots and passes it back to the host once it shuts down.
Note that this setup only works when the laptop is in Hybrid Graphics mode because of its architecture. You could technically adapt it to work while in Discrete Graphics mode as well, but you would have to give up on using your Linux environment while Windows is running.
Post contents
UEFI Settings
Before doing anything else, you will need to change a couple of settings in the UEFI menu. While the computer is booting, either spam or hold the F2 key. Once you are in the menu make sure that AMD virtualization is turned on and that the laptop is in Discrete GPU mode.
You can check if virtualization is working by running sudo dmesg | grep IOMMU and sudo dmesg | grep AMD-Vi:
dmesg | grep IOMMU
[    0.000000] Warning: PCIe ACS overrides enabled; This may allow non-IOMMU protected peer-to-peer DMA
[    0.443759] pci 0000:00:00.2: AMD-Vi: IOMMU performance counters supported
[    0.445889] pci 0000:00:00.2: AMD-Vi: Found IOMMU cap 0x40
[    0.454662] perf/amd_iommu: Detected AMD IOMMU #0 (2 banks, 4 counters/bank).
[    0.470609] AMD-Vi: AMD IOMMUv2 driver by Joerg Roedel <jroedel@suse.de>
dmesg | grep AMD-Vi
[    0.100590] AMD-Vi: ivrs, add hid:AMDI0020, uid:\_SB.FUR0, rdevid:160
[    0.100591] AMD-Vi: ivrs, add hid:AMDI0020, uid:\_SB.FUR1, rdevid:160
[    0.100592] AMD-Vi: ivrs, add hid:AMDI0020, uid:\_SB.FUR2, rdevid:160
[    0.100592] AMD-Vi: ivrs, add hid:AMDI0020, uid:\_SB.FUR3, rdevid:160
[    0.443759] pci 0000:00:00.2: AMD-Vi: IOMMU performance counters supported
[    0.443794] AMD-Vi: Lazy IO/TLB flushing enabled
[    0.445889] pci 0000:00:00.2: AMD-Vi: Found IOMMU cap 0x40
[    0.445890] AMD-Vi: Extended features (0x206d73ef22254ade): PPR X2APIC NX GT IA GA PC GA_vAPIC
[    0.445894] AMD-Vi: Interrupt remapping enabled
[    0.445894] AMD-Vi: Virtual APIC enabled
[    0.445894] AMD-Vi: X2APIC enabled
[    0.470609] AMD-Vi: AMD IOMMUv2 driver by Joerg Roedel <jroedel@suse.de>
At this point, you will probably be ready to proceed, but if something went wrong you can try adding amd_iommu=on to your kernel parameters.
Installing QEMU
After booting your laptop, you're going to have to install the required packages (note that most commands in this post are meant to be used on Arch Linux):
pacman -Sy nvidia xf86-video-amdgpu samba qemu qemu-arch-extra libvirt virt-manager edk2-ovmf iptables-nftIf you get a warning about incompatibilities, you should be able to just uninstall the older package. After installation is complete, you will also need to add your user to the libvirt group: sudo usermod -aG libvirt user.
Now you can start the necessary services:
systemctl enable libvirtd.service
virsh net-start default
virsh net-autostart default
Finally, restart your laptop and you should be able to run virt-manager to manage your virtual machines.
Creating a Windows VM
Before doing any complicated hardware passthrough, it's a good idea to create a normal virtual machine to have as a working reference point. You could use Windows 11, but it's been known to have some performance issues that impact Ryzen CPUs, so I recommend sticking with Windows 10 for now.
VirtIO Drivers
Since I had a dual-boot setup before trying VFIO, I had already installed Windows on a second drive. This meant that I could simply pass through the entire drive to the VM, I just needed to install the VirtIO drivers beforehand.
Virt-Manager Configuration
After installing the VirtIO drivers, boot back into Linux and create a new VM in virt-manager:
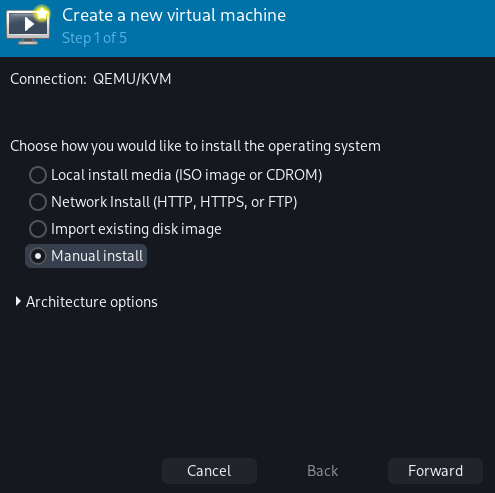
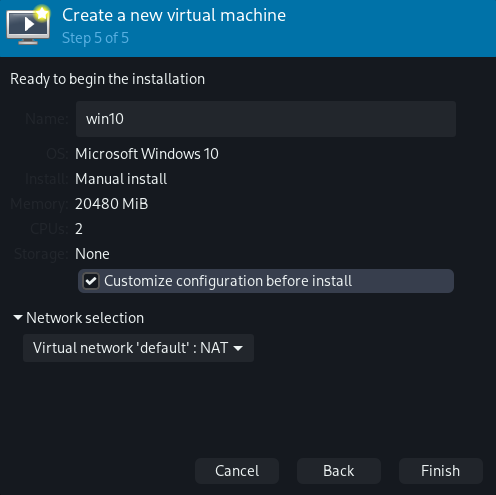
Step 1: Select "Manual Install" and make sure the architecture is set to "x86_64"
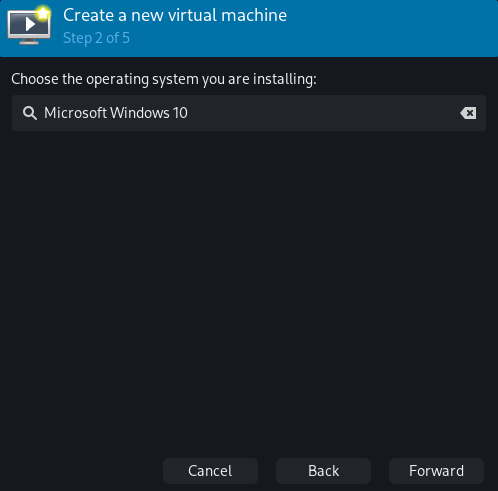
Step 2: Set the Operating System to "Microsoft Windows 10".
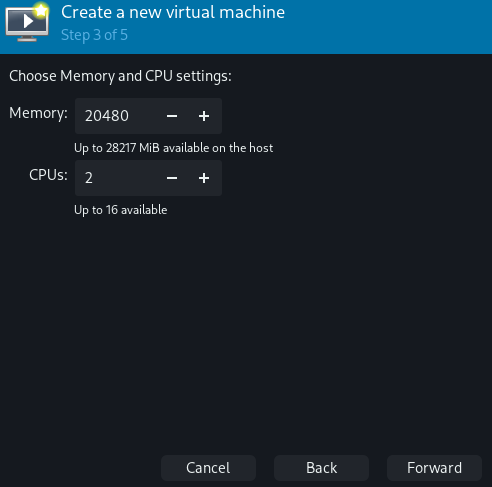
Step 3: Allocate as much memory as you need but make sure to leave some for the host as well. You can see how much memory the host is currently using by running free -m. Changing the CPU options doesn't really matter since we'll manually change them later.
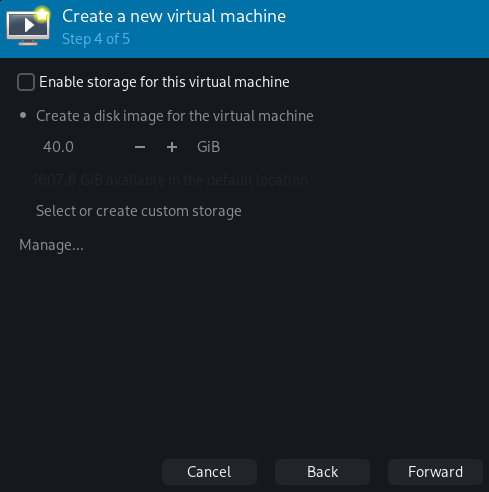
Step 4: Do not enable storage for this virtual machine for now. We'll do that during the customization.
Step 5: Select "Customize configuration before install" and make sure that "Virtual network 'default': NAT" is chosen.
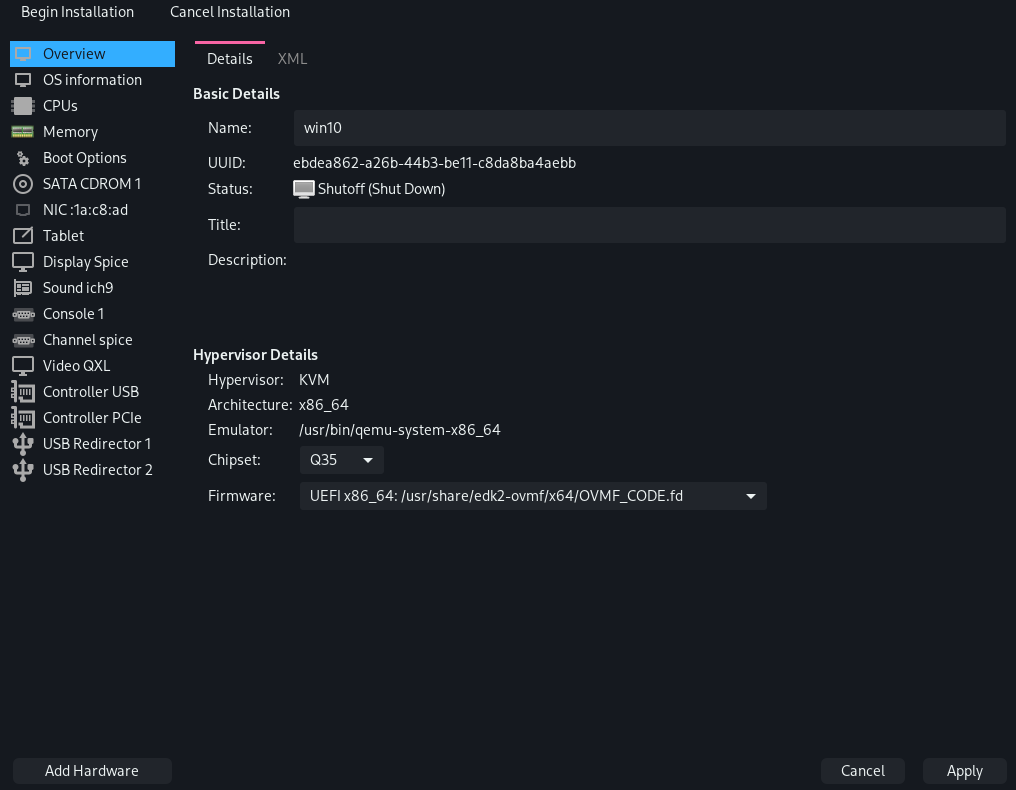
A new window should pop up. This is where you can customize your virtual machine. Before booting it, you should change a couple of options:
Under "Overview", Set the Chipset to "Q35" and the Firmware to "UEFI x86_64: /usr/share/edk2-ovmf/x64/OVMF_CODE.fd". Make sure to click "Apply" before switching pages.
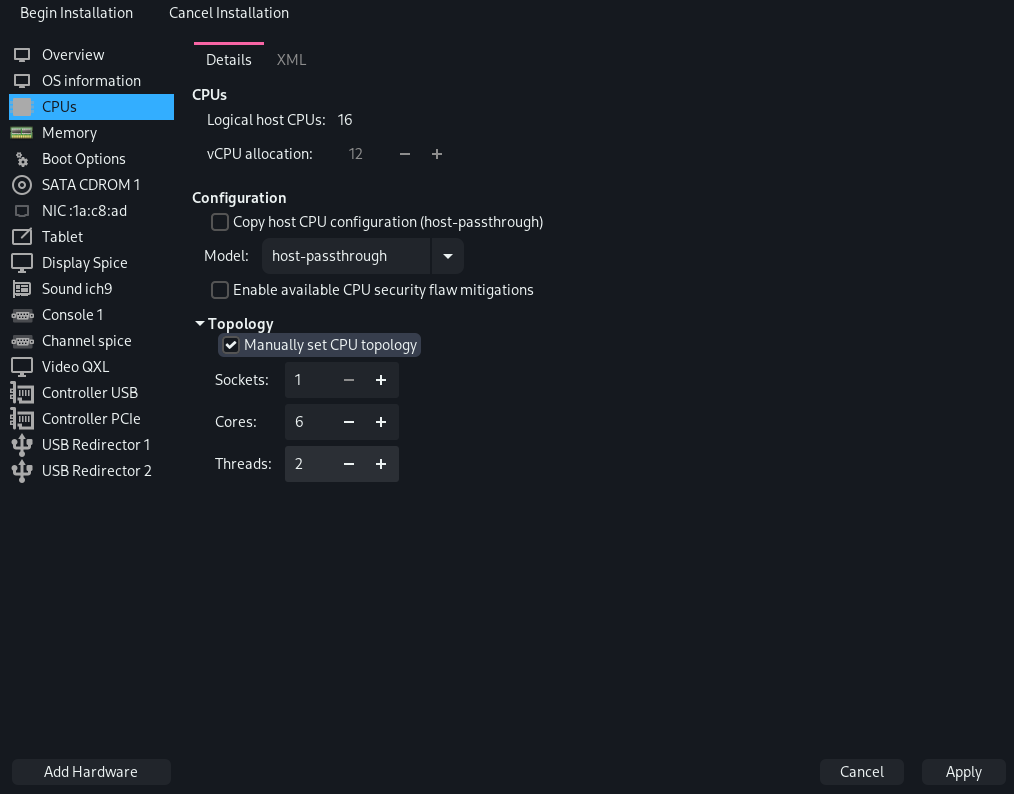
Under "CPUs", deselect "Copy host CPU configuration" and pick host-passthrough. You should also select "Manually set CPU topology" and set 1 Socket, 6 Cores, and 2 Threads (12 total virtual cores), leaving 4 for the host. If you have a different CPU, you should make sure to change these options to fit your configuration.
Click "Add Hardware > Storage" and add the drive that contains Windows. Set "Bus type" to "VirtIO" and "Cache mode" to "none" for better performance.
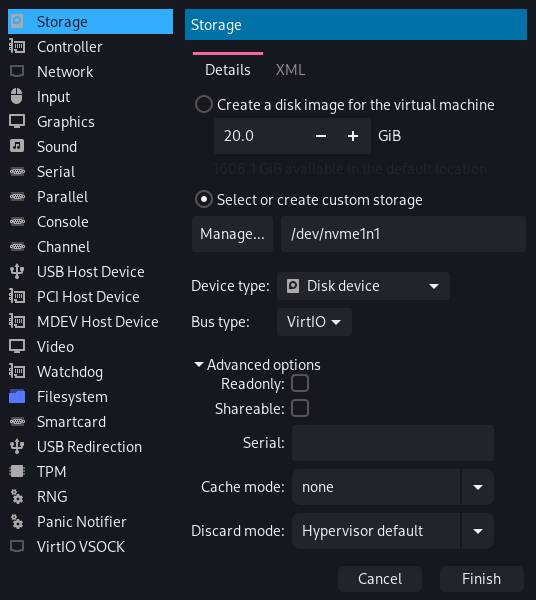
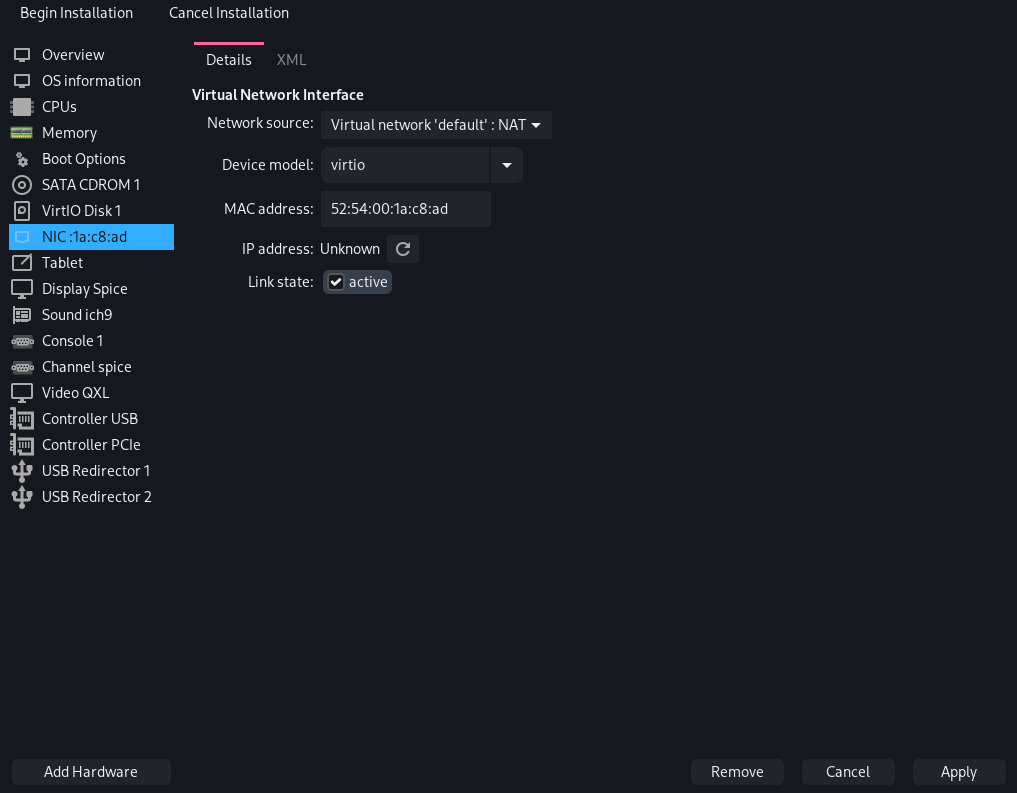
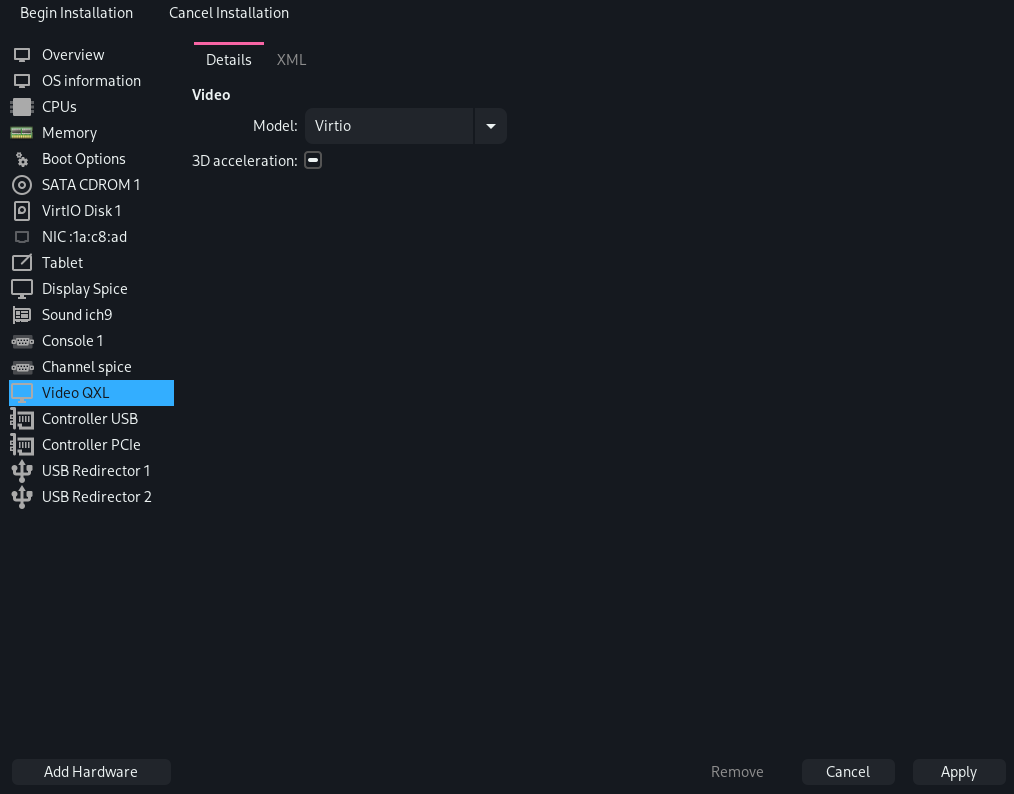
Set the Network Device and Video Device models to "VirtIO".
Finally, click "Begin Installation". You might have to manually add a Boot Entry to the UEFI by pressing the Escape key while the VM is booting, going to "Boot Maintenance Manager > Boot Options > Add Boot Option > Windows Disk > EFI > Microsoft > Boot > bootmgfw.efi".
If you get a "Boot Device Not Found" Blue Screen, make sure that you have the VirtIO drivers mounted, or try booting with a "SATA" drive instead of "VirtIO".
After that, if everything is working fine, you can go ahead and shut down the VM.
IOMMU Groups
Next, we need to figure out the IOMMU groups of the NVIDIA GPU. IOMMU refers to the chipset device that maps virtual addresses to physical addresses of your I/O devices (i.e. GPU, disk, etc.). When passing through a device to a VM, you normally need to pass along all other devices in its IOMMU group.
To check your IOMMU groups, create an iommu.sh script with the following content:
#!/bin/bash
for d in /sys/kernel/iommu_groups/*/devices/*; do
  n=${d#*/iommu_groups/*}; n=${n%%/*}
  printf 'IOMMU Group %s ' "$n"
  lspci -nns "${d##*/}"
done
When you run it, you should see output similar to this:
./iommu.sh
IOMMU Group 0 00:01.0 Host bridge [0600]: Advanced Micro Devices, Inc. [AMD] Renoir PCIe Dummy Host Bridge [1022:1632]
IOMMU Group 10 02:00.0 Non-Volatile memory controller [0108]: Samsung Electronics Co Ltd NVMe SSD Controller PM9A1/PM9A3/980PRO [144d:a80a]
IOMMU Group 11 03:00.0 Ethernet controller [0200]: Realtek Semiconductor Co., Ltd. RTL8111/8168/8411 PCI Express Gigabit Ethernet Controller [10ec:8168] (rev 15)
IOMMU Group 12 04:00.0 Network controller [0280]: Intel Corporation Wi-Fi 6 AX200 [8086:2723] (rev 1a)
IOMMU Group 1 00:01.1 PCI bridge [0604]: Advanced Micro Devices, Inc. [AMD] Renoir PCIe GPP Bridge [1022:1633]
IOMMU Group 2 00:01.2 PCI bridge [0604]: Advanced Micro Devices, Inc. [AMD] Renoir PCIe GPP Bridge [1022:1634]
IOMMU Group 3 00:02.0 Host bridge [0600]: Advanced Micro Devices, Inc. [AMD] Renoir PCIe Dummy Host Bridge [1022:1632]
IOMMU Group 4 00:02.1 PCI bridge [0604]: Advanced Micro Devices, Inc. [AMD] Renoir PCIe GPP Bridge [1022:1634]
IOMMU Group 5 00:02.2 PCI bridge [0604]: Advanced Micro Devices, Inc. [AMD] Renoir PCIe GPP Bridge [1022:1634]
IOMMU Group 6 00:08.0 Host bridge [0600]: Advanced Micro Devices, Inc. [AMD] Renoir PCIe Dummy Host Bridge [1022:1632]
IOMMU Group 6 00:08.1 PCI bridge [0604]: Advanced Micro Devices, Inc. [AMD] Renoir Internal PCIe GPP Bridge to Bus [1022:1635]
IOMMU Group 6 00:08.2 PCI bridge [0604]: Advanced Micro Devices, Inc. [AMD] Renoir Internal PCIe GPP Bridge to Bus [1022:1635]
IOMMU Group 6 05:00.0 Non-Essential Instrumentation [1300]: Advanced Micro Devices, Inc. [AMD] Zeppelin/Raven/Raven2 PCIe Dummy Function [1022:145a] (rev c5)
IOMMU Group 6 05:00.2 Encryption controller [1080]: Advanced Micro Devices, Inc. [AMD] Family 17h (Models 10h-1fh) Platform Security Processor [1022:15df]
IOMMU Group 6 05:00.3 USB controller [0c03]: Advanced Micro Devices, Inc. [AMD] Renoir USB 3.1 [1022:1639]
IOMMU Group 6 05:00.4 USB controller [0c03]: Advanced Micro Devices, Inc. [AMD] Renoir USB 3.1 [1022:1639]
IOMMU Group 6 05:00.6 Audio device [0403]: Advanced Micro Devices, Inc. [AMD] Family 17h (Models 10h-1fh) HD Audio Controller [1022:15e3]
IOMMU Group 6 06:00.0 SATA controller [0106]: Advanced Micro Devices, Inc. [AMD] FCH SATA Controller [AHCI mode] [1022:7901] (rev 81)
IOMMU Group 6 06:00.1 SATA controller [0106]: Advanced Micro Devices, Inc. [AMD] FCH SATA Controller [AHCI mode] [1022:7901] (rev 81)
IOMMU Group 7 00:14.0 SMBus [0c05]: Advanced Micro Devices, Inc. [AMD] FCH SMBus Controller [1022:790b] (rev 51)
IOMMU Group 7 00:14.3 ISA bridge [0601]: Advanced Micro Devices, Inc. [AMD] FCH LPC Bridge [1022:790e] (rev 51)
IOMMU Group 8 00:18.0 Host bridge [0600]: Advanced Micro Devices, Inc. [AMD] Device [1022:166a]
IOMMU Group 8 00:18.1 Host bridge [0600]: Advanced Micro Devices, Inc. [AMD] Device [1022:166b]
IOMMU Group 8 00:18.2 Host bridge [0600]: Advanced Micro Devices, Inc. [AMD] Device [1022:166c]
IOMMU Group 8 00:18.3 Host bridge [0600]: Advanced Micro Devices, Inc. [AMD] Device [1022:166d]
IOMMU Group 8 00:18.4 Host bridge [0600]: Advanced Micro Devices, Inc. [AMD] Device [1022:166e]
IOMMU Group 8 00:18.5 Host bridge [0600]: Advanced Micro Devices, Inc. [AMD] Device [1022:166f]
IOMMU Group 8 00:18.6 Host bridge [0600]: Advanced Micro Devices, Inc. [AMD] Device [1022:1670]
IOMMU Group 8 00:18.7 Host bridge [0600]: Advanced Micro Devices, Inc. [AMD] Device [1022:1671]
IOMMU Group 9 01:00.0 VGA compatible controller [0300]: NVIDIA Corporation GA104M [GeForce RTX 3070 Mobile / Max-Q] [10de:24dd] (rev a1)
IOMMU Group 9 01:00.1 Audio device [0403]: NVIDIA Corporation GA104 High Definition Audio Controller [10de:228b] (rev a1)
What we mainly care about are the GPU groups, specifically:
...
IOMMU Group 9 01:00.0 VGA compatible controller [0300]: NVIDIA Corporation GA104M [GeForce RTX 3070 Mobile / Max-Q] [10de:24dd] (rev a1)
IOMMU Group 9 01:00.1 Audio device [0403]: NVIDIA Corporation GA104 High Definition Audio Controller [10de:228b] (rev a1)
...
If you only want to pass through the GPU, you can go ahead and skip the following section. However, if you want to pass through more devices that are in less than ideal IOMMU groups, ACS patching can help.
Patching the Kernel
By using the ACS override patch, we can basically force the kernel to falsely expose isolation capabilities for our components and add them to separate IOMMU groups. Luckily for us, we don't need to apply the patch ourselves since there is already an AUR package with the patch pre-applied: linux-vfio.
Before building the package, make sure to edit your makepkg settings so that you use all your CPU's cores. You can do that by editing /etc/makepkg.conf and setting the MAKEFLAGS line (under "Architecture, Compile Flags") to -j$(nproc).
...
#-- Make Flags: change this for DistCC/SMP systems
MAKEFLAGS="-j$(nproc)"
...
Afterward, install the needed packages using your favorite AUR helper. In my case, the command is:
yay -S linux-vfio linux-vfio-headers nvidia-dkms xf86-video-amdgpuNote: If you get an error about invalid keys, try running:
gpg --keyserver hkps://keys.openpgp.org --receive-keys [key]You can now go ahead and make a cup of coffee or grab a snack as the building process takes about 20 minutes.
You should also be aware that the amdgpu module is not automatically loaded in the linux-vfio kernel, leading you to a blank screen. This can be easily fixed by creating a /etc/modules-load.d/display.conf file:
amdgpu
nvidia
Finally, make sure to add pcie_acs_override=downstream,multifunction to your kernel's command line parameters. If you are using GRUB, this can be done by editing /etc/default/grub and then running sudo grub-mkconfig -o /boot/grub/grub.cfg.
# GRUB boot loader configuration

GRUB_DEFAULT=""
GRUB_TIMEOUT="1"
GRUB_HIDDEN_TIMEOUT="1"
GRUB_DISABLE_OS_PROBER="false"
GRUB_DISTRIBUTOR="Arch"
GRUB_CMDLINE_LINUX_DEFAULT="quiet pcie_acs_override=downstream,multifunction"
#GRUB_SAVEDEFAULT="false"
#GRUB_DEFAULT="saved"
...
After rebooting, you can check which kernel is running using the command uname -a. If everything went well, you should see that you are using the linux-vfio kernel and that most devices are in different IOMMU groups:
uname -a
Linux eirene 5.14.10-arch1-1-vfio #1 SMP PREEMPT Sat, 06 Nov 2021 18:49:38 +0000 x86_64 GNU/Linux
./iommu.sh
IOMMU Group 0 00:01.0 Host bridge [0600]: Advanced Micro Devices, Inc. [AMD] Renoir PCIe Dummy Host Bridge [1022:1632]
IOMMU Group 10 00:18.0 Host bridge [0600]: Advanced Micro Devices, Inc. [AMD] Device [1022:166a]
IOMMU Group 10 00:18.1 Host bridge [0600]: Advanced Micro Devices, Inc. [AMD] Device [1022:166b]
IOMMU Group 10 00:18.2 Host bridge [0600]: Advanced Micro Devices, Inc. [AMD] Device [1022:166c]
IOMMU Group 10 00:18.3 Host bridge [0600]: Advanced Micro Devices, Inc. [AMD] Device [1022:166d]
IOMMU Group 10 00:18.4 Host bridge [0600]: Advanced Micro Devices, Inc. [AMD] Device [1022:166e]
IOMMU Group 10 00:18.5 Host bridge [0600]: Advanced Micro Devices, Inc. [AMD] Device [1022:166f]
IOMMU Group 10 00:18.6 Host bridge [0600]: Advanced Micro Devices, Inc. [AMD] Device [1022:1670]
IOMMU Group 10 00:18.7 Host bridge [0600]: Advanced Micro Devices, Inc. [AMD] Device [1022:1671]
IOMMU Group 11 01:00.0 VGA compatible controller [0300]: NVIDIA Corporation GA104M [GeForce RTX 3070 Mobile / Max-Q] [10de:24dd] (rev a1)
IOMMU Group 12 01:00.1 Audio device [0403]: NVIDIA Corporation GA104 High Definition Audio Controller [10de:228b] (rev a1)
IOMMU Group 13 02:00.0 Non-Volatile memory controller [0108]: Samsung Electronics Co Ltd NVMe SSD Controller PM9A1/PM9A3/980PRO [144d:a80a]
IOMMU Group 14 03:00.0 Ethernet controller [0200]: Realtek Semiconductor Co., Ltd. RTL8111/8168/8411 PCI Express Gigabit Ethernet Controller [10ec:8168] (rev 15)
IOMMU Group 15 04:00.0 Network controller [0280]: Intel Corporation Wi-Fi 6 AX200 [8086:2723] (rev 1a)
IOMMU Group 16 05:00.0 Non-Essential Instrumentation [1300]: Advanced Micro Devices, Inc. [AMD] Zeppelin/Raven/Raven2 PCIe Dummy Function [1022:145a] (rev c5)
IOMMU Group 17 05:00.2 Encryption controller [1080]: Advanced Micro Devices, Inc. [AMD] Family 17h (Models 10h-1fh) Platform Security Processor [1022:15df]
IOMMU Group 18 05:00.3 USB controller [0c03]: Advanced Micro Devices, Inc. [AMD] Renoir USB 3.1 [1022:1639]
IOMMU Group 19 05:00.4 USB controller [0c03]: Advanced Micro Devices, Inc. [AMD] Renoir USB 3.1 [1022:1639]
IOMMU Group 1 00:01.1 PCI bridge [0604]: Advanced Micro Devices, Inc. [AMD] Renoir PCIe GPP Bridge [1022:1633]
IOMMU Group 20 05:00.6 Audio device [0403]: Advanced Micro Devices, Inc. [AMD] Family 17h (Models 10h-1fh) HD Audio Controller [1022:15e3]
IOMMU Group 21 06:00.0 SATA controller [0106]: Advanced Micro Devices, Inc. [AMD] FCH SATA Controller [AHCI mode] [1022:7901] (rev 81)
IOMMU Group 22 06:00.1 SATA controller [0106]: Advanced Micro Devices, Inc. [AMD] FCH SATA Controller [AHCI mode] [1022:7901] (rev 81)
IOMMU Group 2 00:01.2 PCI bridge [0604]: Advanced Micro Devices, Inc. [AMD] Renoir PCIe GPP Bridge [1022:1634]
IOMMU Group 3 00:02.0 Host bridge [0600]: Advanced Micro Devices, Inc. [AMD] Renoir PCIe Dummy Host Bridge [1022:1632]
IOMMU Group 4 00:02.1 PCI bridge [0604]: Advanced Micro Devices, Inc. [AMD] Renoir PCIe GPP Bridge [1022:1634]
IOMMU Group 5 00:02.2 PCI bridge [0604]: Advanced Micro Devices, Inc. [AMD] Renoir PCIe GPP Bridge [1022:1634]
IOMMU Group 6 00:08.0 Host bridge [0600]: Advanced Micro Devices, Inc. [AMD] Renoir PCIe Dummy Host Bridge [1022:1632]
IOMMU Group 7 00:08.1 PCI bridge [0604]: Advanced Micro Devices, Inc. [AMD] Renoir Internal PCIe GPP Bridge to Bus [1022:1635]
IOMMU Group 8 00:08.2 PCI bridge [0604]: Advanced Micro Devices, Inc. [AMD] Renoir Internal PCIe GPP Bridge to Bus [1022:1635]
IOMMU Group 9 00:14.0 SMBus [0c05]: Advanced Micro Devices, Inc. [AMD] FCH SMBus Controller [1022:790b] (rev 51)
IOMMU Group 9 00:14.3 ISA bridge [0601]: Advanced Micro Devices, Inc. [AMD] FCH LPC Bridge [1022:790e] (rev 51)
Creating the Hook Scripts
Before doing any passthrough, we need to create the scripts that will allocate the necessary resources to the VM before it boots and de-allocate them after it shuts down. To do that, we are going to be using libvirt hooks and The Passthrough Post's hook helper. You can find all the needed scripts in this project's git repository.
Go ahead and run the following commands:
mkdir -p /etc/libvirt/hooks
wget 'https://raw.githubusercontent.com/PassthroughPOST/VFIO-Tools/master/libvirt_hooks/qemu' -O /etc/libvirt/hooks/qemu
chmod +x /etc/libvirt/hooks/qemu
systemctl restart libvirtd.service
Next, you need to set up the directory structure, like so:
tree /etc/libvirt/hooks/
/etc/libvirt/hooks/
├── qemu
└── qemu.d
    └── win10
        ├── prepare
        │   └── begin
        ├── release
        │   └── end
        └── started
            └── begin
Scripts in the prepare/begin directory will be executed before the VM starts, scripts in the started/begin directory will be executed once the VM starts, and scripts in the release/end directory will be executed once the VM shuts down.
Environment Variables
The first file we are going to create will contain all of our environment variables, specifically the addresses of the GPU we are going to pass through. Create a kvm.conf file in /etc/libvirt/hooks:
## Virsh devices
VIRSH_GPU_VIDEO=pci_0000_01_00_0
VIRSH_GPU_AUDIO=pci_0000_01_00_1
MEMORY=20480
WIN=/dev/nvme1n1p3
The addresses should be the same if you are using a Legion 7 but you can double-check by re-running iommu.sh.
Set WIN to the Windows partition if you want to unmount it automatically once the VM starts.
Start Script
Now we are going to create the script that prepares the host for passthrough. Create a start.sh file in /etc/libvirt/hooks/qemu.d/Win10/prepare/begin with the following contents:
#!/bin/bash

set -x

# Load Variables
source "/etc/libvirt/hooks/kvm.conf"

# Unmount the Windows drive
umount $WIN || /bin/true

# Stop LightDM
systemctl stop lightdm.service
sleep 2

# Calculate number of hugepages to allocate from memory (in MB)
HUGEPAGES="$(($MEMORY/$(($(grep Hugepagesize /proc/meminfo | awk '{print $2}')/1024))))"

echo "Allocating hugepages..."
echo $HUGEPAGES > /proc/sys/vm/nr_hugepages
ALLOC_PAGES=$(cat /proc/sys/vm/nr_hugepages)

TRIES=0
while (( $ALLOC_PAGES != $HUGEPAGES && $TRIES < 1000 ))
do
    echo 1 > /proc/sys/vm/compact_memory            ## defrag ram
    echo $HUGEPAGES > /proc/sys/vm/nr_hugepages
    ALLOC_PAGES=$(cat /proc/sys/vm/nr_hugepages)
    echo "Succesfully allocated $ALLOC_PAGES / $HUGEPAGES"
    let TRIES+=1
done

if [ "$ALLOC_PAGES" -ne "$HUGEPAGES" ]
then
    echo "Not able to allocate all hugepages. Reverting..."
    echo 0 > /proc/sys/vm/nr_hugepages
    exit 1
fi

# Unload all Nvidia drivers
modprobe -r nvidia_drm
modprobe -r nvidia_modeset
modprobe -r nvidia_uvm
modprobe -r nvidia

# Unbind the GPU from display driver
virsh nodedev-detach $VIRSH_GPU_VIDEO
virsh nodedev-detach $VIRSH_GPU_AUDIO

# Load VFIO kernel modules
modprobe vfio
modprobe vfio_pci
modprobe vfio_iommu_type1

# Create looking glass shm
systemd-tmpfiles --create /etc/tmpfiles.d/10-looking-glass.conf

# Enable CPU governor performance mode
cat /sys/devices/system/cpu/cpu*/cpufreq/scaling_governor
for file in /sys/devices/system/cpu/cpu*/cpufreq/scaling_governor; do echo "performance" > $file; done
cat /sys/devices/system/cpu/cpu*/cpufreq/scaling_governor

# Isolate host
systemctl set-property --runtime -- user.slice AllowedCPUs=12,13,14,15
systemctl set-property --runtime -- system.slice AllowedCPUs=12,13,14,15
systemctl set-property --runtime -- init.scope AllowedCPUs=12,13,14,15
Make sure to change the highlighted lines to match your system:
- Line 12 should stop whatever display manager you are using.
- Lines 40-43 should unload all available Nvidia drivers and their dependencies. You can see them by running
lsmod | grep -i nvidia.
Started Script
Next, we are going to create the script that re-launches our display manager using only integrated graphics. Create a lightdm.sh file in /etc/libvirt/hooks/qemu.d/win10/started/begin:
#!/bin/bash

# Uncomment autologin lines in /etc/lightdm/lightdm.conf
sed -i 's/^#autologin-user=/autologin-user=/' /etc/lightdm/lightdm.conf
sed -i 's/^#autologin-user-timeout=/autologin-user-timeout=/' /etc/lightdm/lightdm.conf
sed -i 's/^#autologin-session=/autologin-session=/' /etc/lightdm/lightdm.conf

# Restart lightdm
systemctl restart lightdm.service

# Sleep 10 seconds
sleep 10

# Comment out autologin lines in /etc/lightdm/lightdm.conf
sed -i 's/^autologin-user=/#autologin-user=/' /etc/lightdm/lightdm.conf
sed -i 's/^autologin-user-timeout=/#autologin-user-timeout=/' /etc/lightdm/lightdm.conf
sed -i 's/^autologin-session=/#autologin-session=/' /etc/lightdm/lightdm.conf
Revert Script
Finally, we are going to create the script that reverts the host once the VM shuts down. This is basically going to be the inverse of the previous script with a couple of small differences. Create a revert.sh file in /etc/libvirt/hooks/qemu.d/win10/release/end:
#!/bin/bash

set -x

# Load Variables
source "/etc/libvirt/hooks/kvm.conf"

# Deisolate host
systemctl set-property --runtime -- user.slice AllowedCPUs=0-15
systemctl set-property --runtime -- system.slice AllowedCPUs=0-15
systemctl set-property --runtime -- init.scope AllowedCPUs=0-15

# Enable CPU governor schedutil mode
cat /sys/devices/system/cpu/cpu*/cpufreq/scaling_governor
for file in /sys/devices/system/cpu/cpu*/cpufreq/scaling_governor; do echo "schedutil" > $file; done
cat /sys/devices/system/cpu/cpu*/cpufreq/scaling_governor

# Delete looking glass shm
rm /dev/shm/looking-glass

# Unload VFIO kernel modules
modprobe -r vfio_pci
modprobe -r vfio_iommu_type1
modprobe -r vfio

# Rebind the GPU to display driver
virsh nodedev-reattach $VIRSH_GPU_VIDEO
virsh nodedev-reattach $VIRSH_GPU_AUDIO

# Read our nvidia configuration before starting our graphics
nvidia-xconfig --query-gpu-info > /dev/null 2>&1

# Load all Nvidia drivers
modprobe nvidia_drm
modprobe nvidia_modeset
modprobe nvidia_uvm
modprobe nvidia

# Dealloc hugepages
echo 0 > /proc/sys/vm/nr_hugepages

# Mount the Windows drive
mount -a || /bin/true
- Line 31 wakes up the GPU by querying its config, it might be redundant.
- Lines 34-37 load all drivers that were unloaded in the start script.
You should also make sure that the scripts are owned by root and have execute permissions before moving on to the next section.
Passing Through Devices
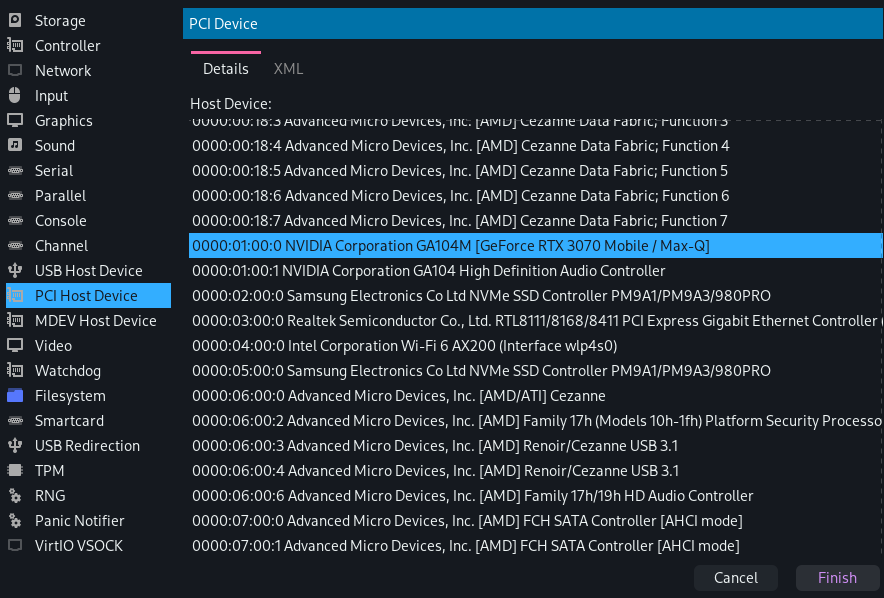
Now is finally time to pass through the GPU. Open virt-manager, select your VM, and click the "Add Hardware > PCI Host Device" button. You should see a large list containing the same devices as shown when running the iommu.sh script.
Nvidia GPU
Select your GPU, as well as any other devices that were in the same IOMMU group, and add them to the VM.
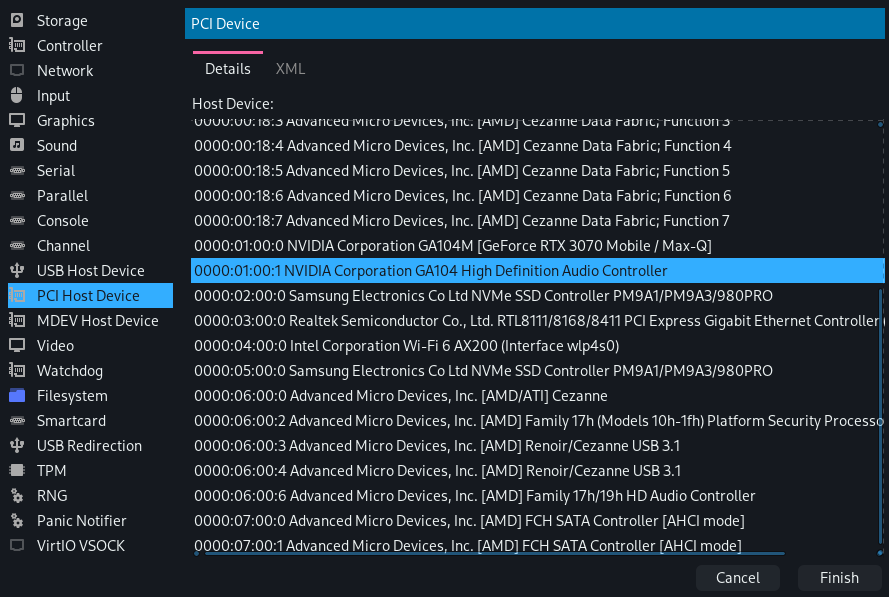
You can also add any other devices you like such as network cards or a USB controller, but make sure to also add their IOMMU neighbors.
Virtual Battery
When using mobile graphics cards, the Nvidia driver wants to check the status of the power supply. Since we are using a VM, no battery is present, and the driver shows the infamous "Error 43".
To fix this, download a custom ACPI table and edit your VM's XML like so:
<domain xmlns:qemu="http://libvirt.org/schemas/domain/qemu/1.0" type="kvm">
  ...
  <qemu:commandline>
    <qemu:arg value="-acpitable"/>
    <qemu:arg value="file=/path/to/your/SSDT1.dat"/>
  </qemu:commandline>
</domain>
Tuning Performance
You could technically now boot the VM, install Looking Glass, and be good to go. However, there are a couple of things you can do to greatly improve performance.
CPU Pinning
CPU Pinning is the assignment of a process or task to a specific CPU core. This has the advantage of significantly increasing cache utilization, and therefore performance.
To see which cores you need to pin, you can use the lstopo utility:
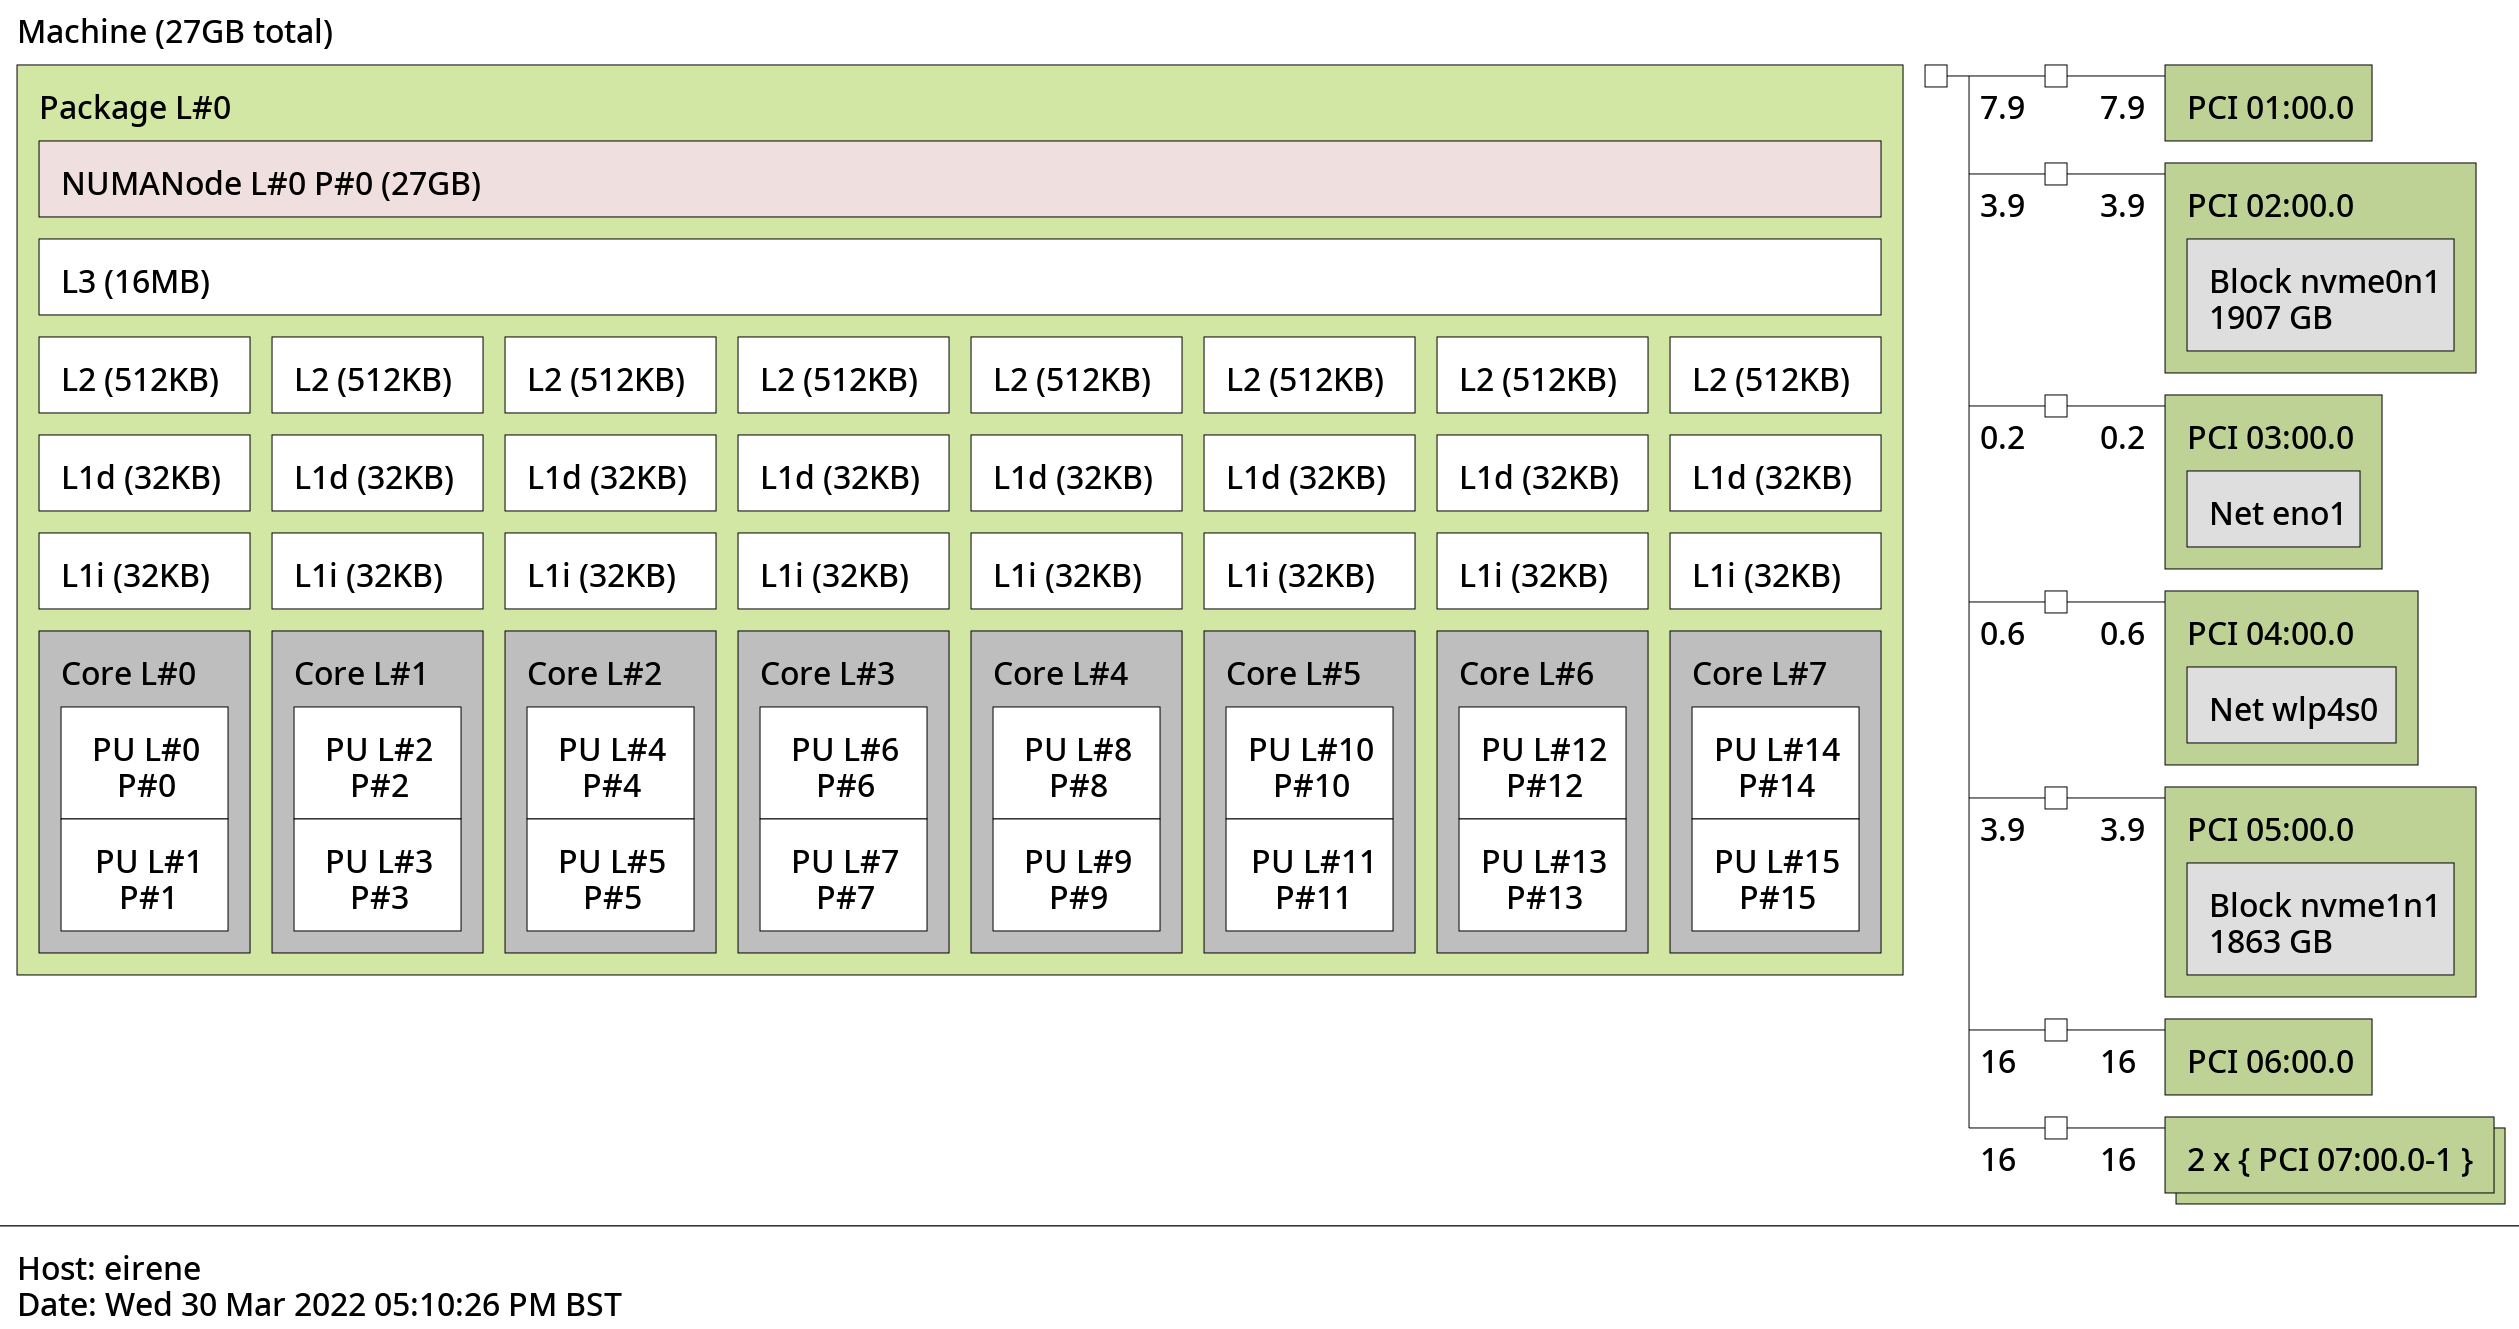
Next up, edit your VM XML, and add the following parameters (make sure to pin neighboring cores):
...
  <vcpu placement="static">12</vcpu>
  <cputune>
    <vcpupin vcpu="0" cpuset="0"/>
    <vcpupin vcpu="1" cpuset="1"/>
    <vcpupin vcpu="2" cpuset="2"/>
    <vcpupin vcpu="3" cpuset="3"/>
    <vcpupin vcpu="4" cpuset="4"/>
    <vcpupin vcpu="5" cpuset="5"/>
    <vcpupin vcpu="6" cpuset="6"/>
    <vcpupin vcpu="7" cpuset="7"/>
    <vcpupin vcpu="8" cpuset="8"/>
    <vcpupin vcpu="9" cpuset="9"/>
    <vcpupin vcpu="10" cpuset="10"/>
    <vcpupin vcpu="11" cpuset="11"/>
  </cputune>
  ...
  <cpu mode="host-passthrough" check="none" migratable="on">
    <topology sockets="1" dies="1" cores="6" threads="2"/>
    <cache mode="passthrough"/>
  </cpu>
...
If you are using an AMD CPU, you will also want to enable SMT:
...
  <cpu mode="host-passthrough" check="none" migratable="on">
    ...
    <feature policy="require" name="topoext"/>
  </cpu>
...
Hugepages
After pinning your CPU cores, you will also want to enable huge pages to reduce memory latency. The hook scripts should handle memory allocation automatically, but you still need to edit your XML:
...
  <memory unit="KiB">20971520
  <currentMemory unit="KiB">20971520
  <memoryBacking>
    <hugepages/>
  </memoryBacking>
...
Hyper-V Enlightenments
You should also enable some Hyper-V enlightenments to help the guest OS handle nested virtualization. You can find more information on what each option does here.
...
  <features>
    <acpi/>
    <apic/>
    <hyperv mode="custom">
      <relaxed state="on"/>
      <vapic state="on"/>
      <spinlocks state="on" retries="8191"/>
      <vpindex state="on"/>
      <synic state="on"/>
      <stimer state="on"/>
      <reset state="on"/>
      <vendor_id state="on" value="whatever"/>
      <frequencies state="on"/>
    </hyperv>
    <kvm>
      <hidden state="on"/>
    </kvm>
    <vmport state="off"/>
  </features>
...
Disabling Memballoon
The VirtIO memballoon device allows the host to reclaim memory from a running VM. However, this functionality comes at a performance cost, so you can disable it by editing the <memballoon> tag in your XML like so:
...
    <memballoon model="none"/>
...
Setting up Looking Glass
If you were to boot the VM now, you would notice that even though the GPU is passed through correctly, it is unusable. This happens because the Nvidia drivers expect a display to be connected, but we don't actually have one.
This is where a Dummy HDMI plug can come in handy. This little device can be used to trick the GPU into thinking a display is connected. The resolution of the plug doesn't really matter since we can set a custom one from the Nvidia control panel anyway.
We can then use Looking Glass to hijack the display signal and pass it back to the host with minimal latency. Download the host application and install it on your Windows VM. Once you're done, shut the VM down and follow the instructions below to finish the configuration.
Video Streaming
First, you need to create the shared memory config. Create a new /etc/tmpfiles.d/10-looking-glass.conf file with the following contents:
f /dev/shm/looking-glass 0666 root libvirt -
You should also make sure that your user is in the libvirt group. After that, edit your XML and add the following in the <devices> section:
...
    <shmem name="looking-glass">
      <model type="ivshmem-plain"/>
      <size unit="M">64
      <address type="pci" domain="0x0000" bus="0x10" slot="0x01" function="0x0"/>
    </shmem>
...
Once that's done, you should be able to remove any other graphics devices from your VM, plug the Dummy HDMI, and open the looking glass client on your host. If everything was set up correctly, you should see the Windows lock screen.
If you also want to pass through mouse and keyboard input using Looking Glass, you can simply add a new "Display Spice" device and set its model type to "none". You should also remove any "Tablet" devices you might have.
Finally, to enable clipboard sharing, edit your spicevmc channel like so:
...
    <channel type="spicevmc">
      <target type="virtio" name="com.redhat.spice.0"/>
      <address type="virtio-serial" controller="0" bus="0" port="1"/>
    </channel>
...
Streaming Audio
Now that video passthrough is configured, there's only one step left: audio passthrough. First, edit your QEMU configuration and add your user id. You can find it using the id command.
...
user = 1000
...
Next, edit your XML once again, and add the following in the devices section:
...
    <sound model="ich9">
      <codec type="micro"/>
      <audio id="1"/>
    </sound>
    <audio id="1" type="pulseaudio" serverName="/run/user/1000/pulse/native">
      <input mixingEngine="no"/>
      <output mixingEngine="no"/>
    </audio>
...
If everything went well, you should now be able to hear your Windows VM's audio outputs on your host.
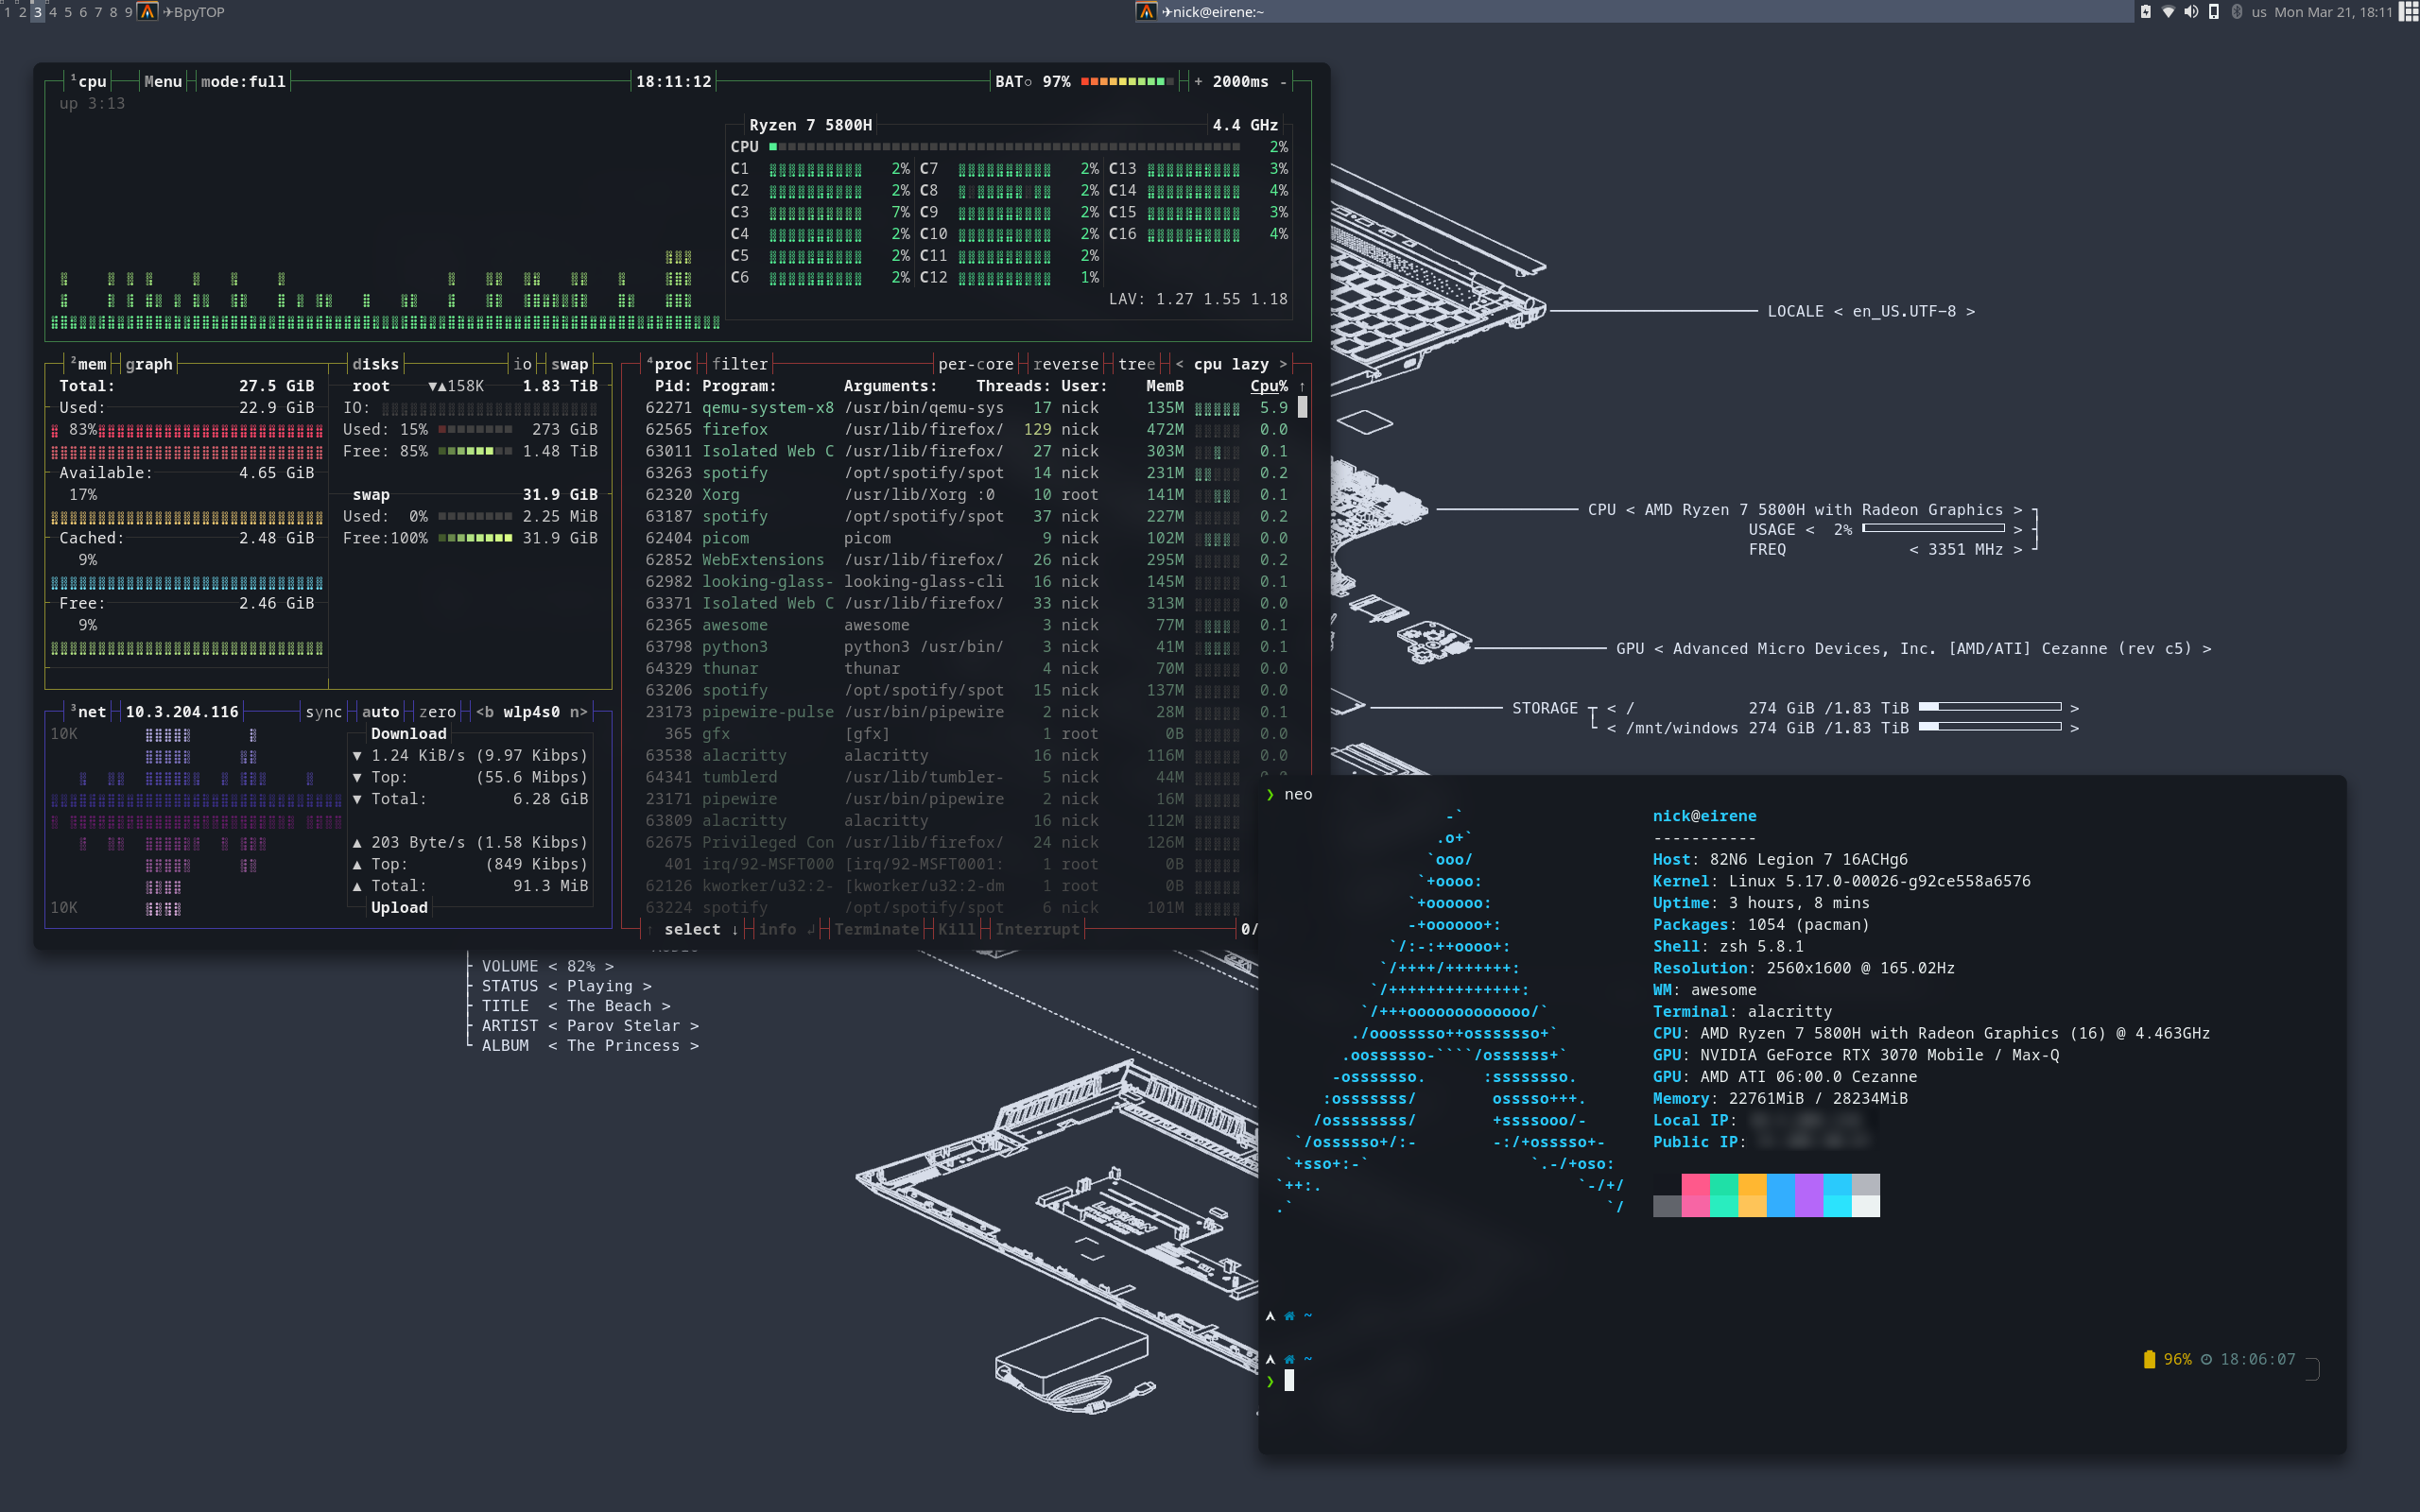
Results
It is not often that you find a laptop with hardware capable of VFIO passthrough, so seeing this one work so flawlessly was a treat:
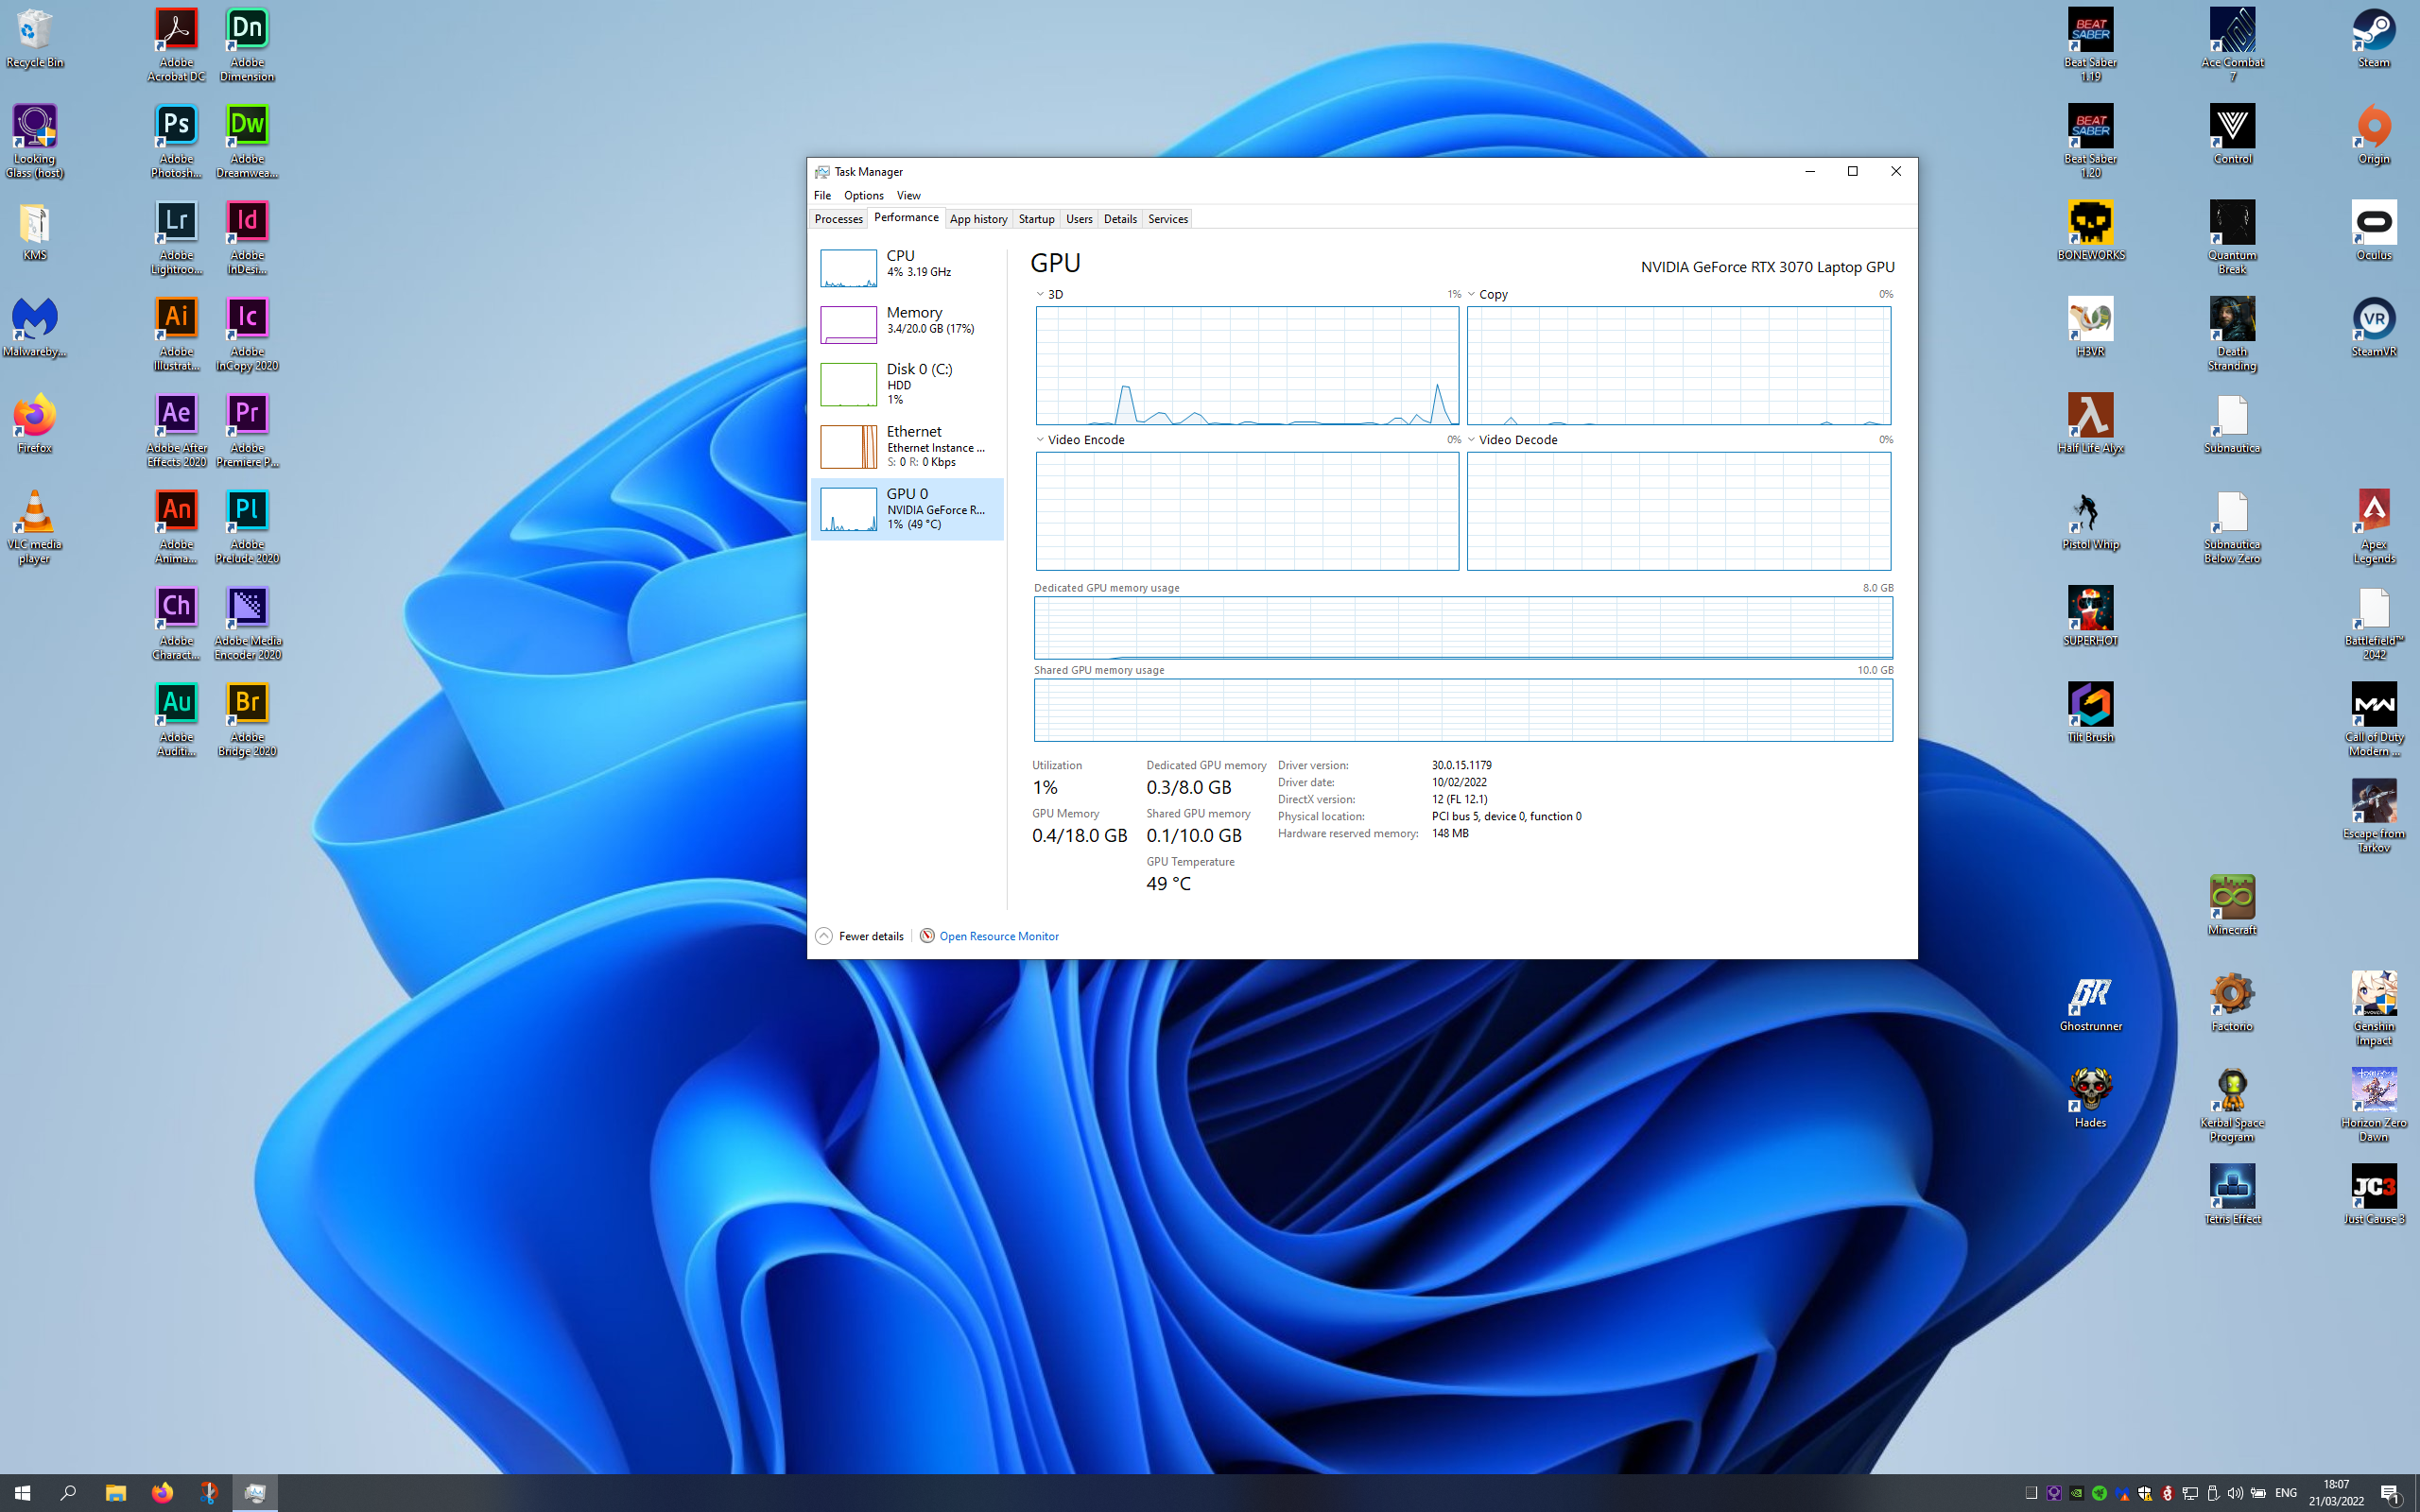
After some not-so-thorough benchmarking, I can say that I get around 75% of the performance compared to bare-metal Windows. This is not that big of a problem for normal usage, however, if I ever need that extra boost, I can simply boot Windows from GRUB and be good to go.
Was there a point in wasting all this time on such a fiddly setup? Maybe. Was it fun? Definitely.
Resources
A very special thanks to the authors and contributors of the following guides and blog posts: