Building the Ultimate Linux Home Server - Part 2: Docker, Automatic Updates, and File Sharing
In part 1 we started building a Linux Home Server using a combination of Arch Linux, MergerFS, and SnapRAID. In this part, we are going to be continuing our journey by installing Docker, Portainer, and Watchtower for easy container management, as well as run our first service.
Post contents
What is Docker and why should I use it?
Docker is an OS-level virtualization project that allows users to install and run applications inside so-called containers, isolated from the operating system and each other. This means that when running a docker container, one does not have to worry about conflicting dependencies, networking, or junk files left behind when removing a service.
Why should we use Docker instead of another virtualization solution like VMWare, VirtualBox, or KVM? The main reason is performance improvements. While each VM has to simulate its own hardware and run a separate guest operating system, Docker containers instead run as a process in userspace, therefore sharing the host OS' kernel and resources.
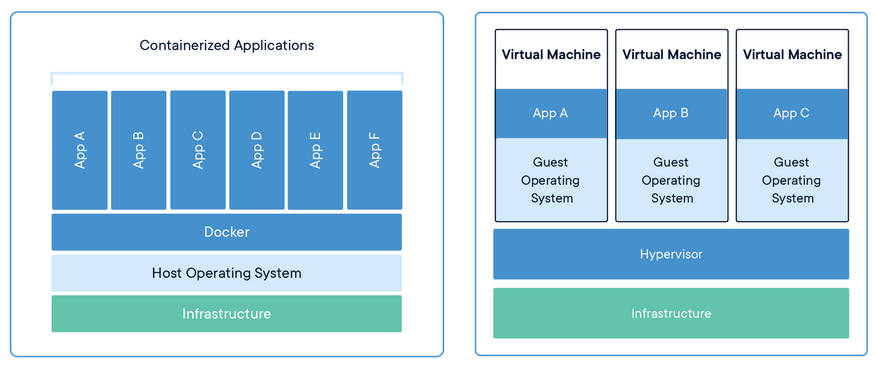
Because of this, containers can boot in seconds, have near bare-metal performance, use way fewer resources than VMs, and are more portable because of their smaller size.
Installation
Installing Docker on Arch Linux is incredibly simple:
pacman -S docker docker-compose
gpasswd -a nick docker
systemctl start docker.service
systemctl enable docker.service
reboot
After installing it, you can run a test by using the official hello-world image. If everything went well, you should see the following output:
docker run --rm hello-world
Hello from Docker!
This message shows that your installation appears to be working correctly.
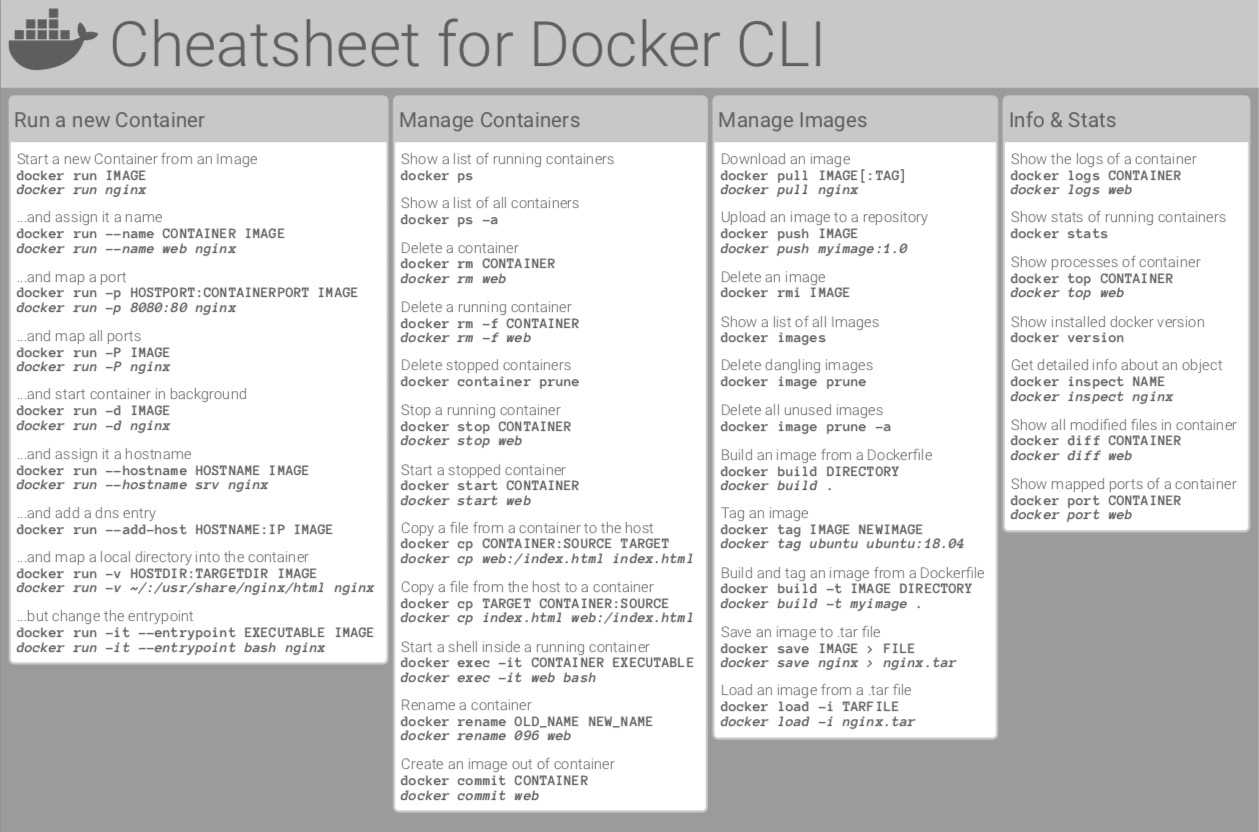
...If you want to familiarise yourself with Docker you can experiment by running containers found in the Docker Hub, reading the docs, or taking a look at the cheat sheet.
Portainer
We could stop here and manage all our applications using the command line, but sometimes using a Web UI is more convenient. This is where Portainer comes in: It's a web app that makes it easy to manage Docker containers, networks, compose stacks, volumes, and more, all through a user-friendly UI.
To install it we are going to run the following commands:
docker volume create portainer_data
docker run -d --name=portainer \
              -e PGID=1000 \
              -e PUID=1000 \
              -p 8000:8000 \
              -p 9000:9000 \
              --restart=unless-stopped \
              -v /var/run/docker.sock:/var/run/docker.sock \
              -v portainer_data:/data \
              -v /mnt/storage/configs:/configs \
              portainer/portainer-ce
Here's a brief walkthrough of what each option does:
-d: Run container in the background (detached)--name=portainer: The name of the container-e PGID=1000and-e PUID=1000: Set environmental variablesPGIDandPUIDto 1000 (your user id, runidto check it)-p 8000:8000: Expose port 8000 on the host and bind it to port 8000 in the container-p 9000:9000: Same as above--restart=unless-stopped: Automatically restart the container if it crashes or when the server boots-v a:b: Bind directoryaon the host to directorybin the container-v /var/run/docker.sock:/var/run/docker.sock: Give Portainer access to the host's Docker socket
After running the command, you can access the web UI using a browser at [local_server_ip]:9000. In my case, that would be 192.168.1.254:9000.
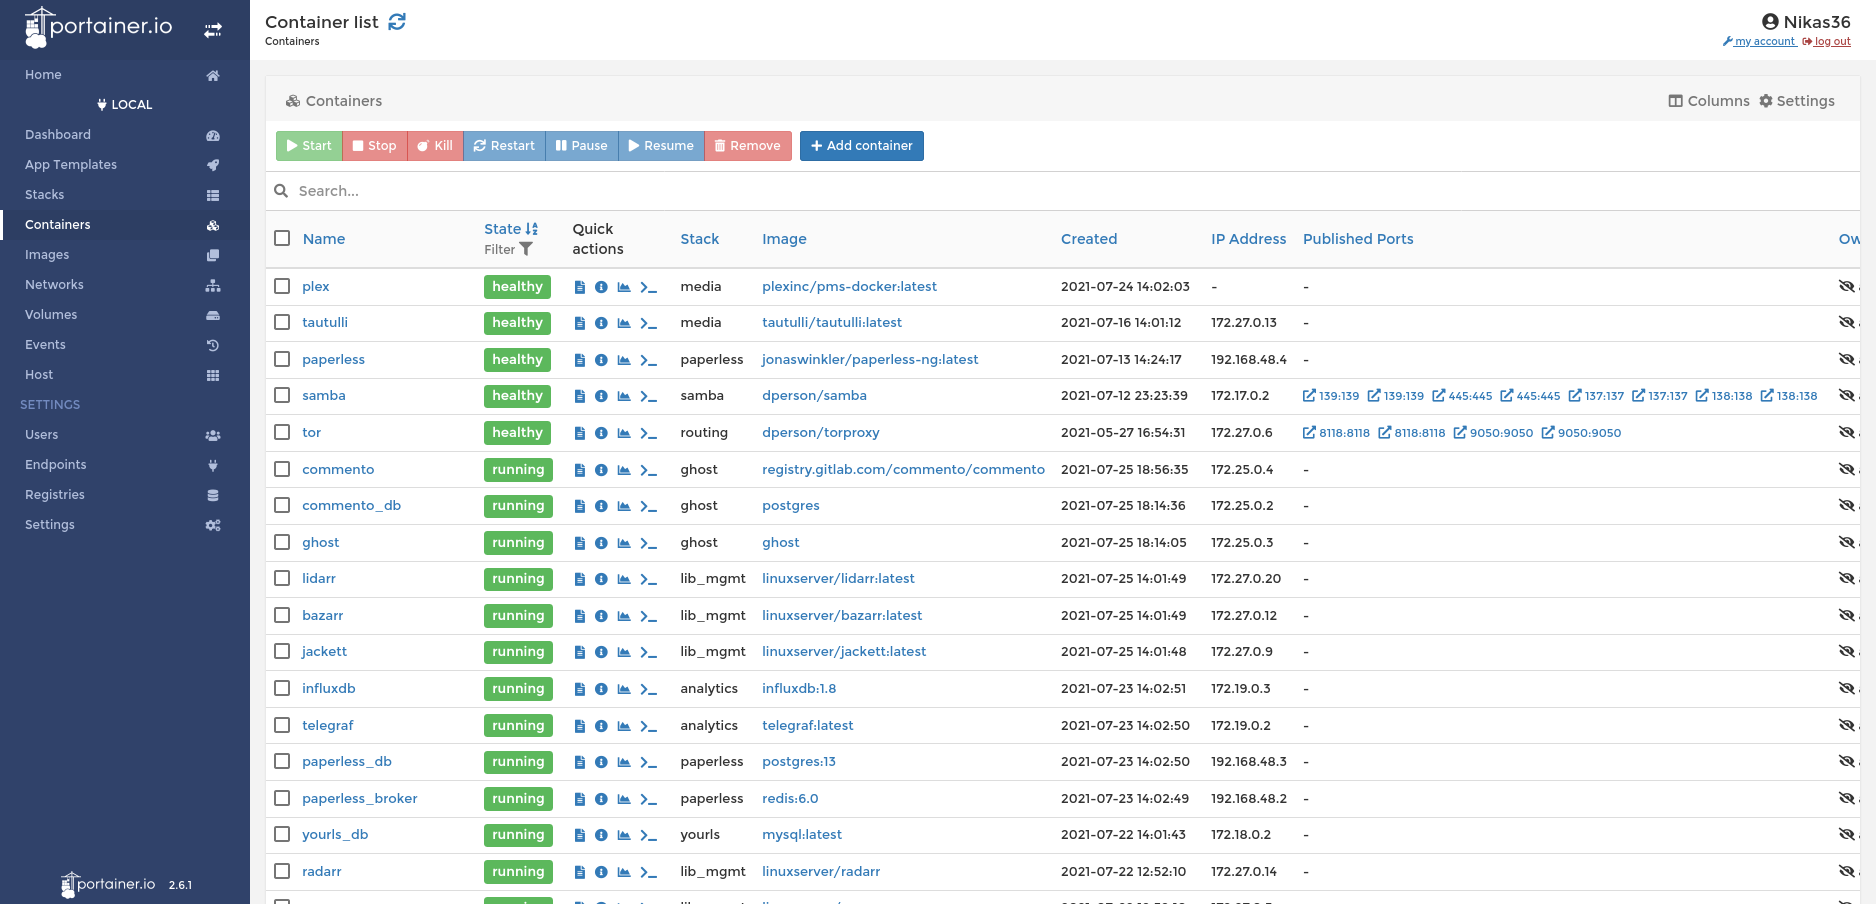
We're going to come back to Portainer in the next post, where we will be setting up a routing stack to handle our networking.
Watchtower
We can now start and manage already existing containers easily, but what about updating them? One could manually stop, remove, and recreate containers every time they need an update, but that gets tiresome, especially when dealing with a large number of them. That's why we will use Watchtower to automatically update all containers once every week.
Installation is once again simple:
docker run -d --name=watchtower \
              -e PGID=1000 \
              -e PUID=1000 \
              --restart=unless-stopped \
              -v /var/run/docker.sock:/var/run/docker.sock \
              containrrr/watchtower \
              --schedule "0 0 4 * * *" \
              --cleanup
The two new arguments we use are specific to this image, that's why they are placed after its name:
--schedule "0 0 4 * * *": Update containers every day at 4 A.M.--cleanup: Remove old images
If all goes well, Watchtower should monitor and automatically check for container updates every day. If you want to stop a container from auto-updating, run it with the label --label=com.centurylinklabs.watchtower.enable=false.
Samba
Now that we have finished setting up Docker, we can start deploying some actually useful services. The first of these is going to be Samba, a tool that allows server volumes to be accessed by other devices on the network.
Before we begin, we need to create our folder structure and set permissions.
cd /mnt/storage
# Create folders and set their owner
mkdir configs private public

# Set default permissions for private and config folders
sudo chmod -R 770 configs private
sudo setfacl -R -d -m g::rwx configs private
sudo setfacl -R -d -m o::- configs private

# Set default permissions for public folder
sudo chmod -R 777 public
sudo setfacl -R -d -m g::rwx public
sudo setfacl -R -d -m o::rwx public
Next, open Portainer, go to the stacks tab, and add a new stack named samba. In the docker-compose field, paste the following, and modify it to your liking:
version: '3.9'

services:
    samba:
        image: dperson/samba
        container_name: samba
        restart: unless-stopped
        environment:
            - 'TZ=Europe/Athens'
            - 'USERID=1000'
            - 'GROUPID=1000'
            - 'USER1=user1;password1'
            - 'USER2=user2;password2'
            - 'SHARE1=public;/mount/public;yes;no;yes;all'
            - 'SHARE2=user1;/mount/private/user1;yes;no;no;user1'
            - 'SHARE3=user2;/mount/private/user2;yes;no;no;user2'
        volumes:
            - '/mnt/storage:/mount'
        ports:
            - "139:139/tcp"
            - "445:445/tcp"
        network_mode: bridge
        stdin_open: true
        tty: true
For more information on what each option does, you can check the project's repository. After you are satisfied with your settings, click deploy the stack, wait a couple of seconds, and try accessing your new file share from a different computer.
Final Thoughts
By now, you should have installed and configured Docker, Portainer, and Watchtower for container management, along with Samba for all your network storage needs. In the next part, we are going to start exposing our server to the internet using OpenVPN, Cloudflare, and Nginx Proxy Manager.


