Building the Ultimate Linux Home Server - Part 3: Cloudflare, OpenVPN, and Nginx Proxy Manager
Up until now, we've only been able to access our server while connected to the same network. In this post, we are going to configure OpenVPN so that we can remotely manage it, as well as lay the groundwork for other applications using Cloudflare and Nginx Proxy Manager.
Post contents
Router Configuration
Before we begin, we are going to need to change a couple of settings on our router. Sadly, not all routers are configured the same way so there is no universal guide. Despite that, most will use the same terminology so it's pretty easy to figure it out.
Static IP
By default, most routers use DHCP which means that they assign dynamic IP addresses to every device that connects to them. However, this makes it difficult to consistently access our server. This is why we are going to give it a static IP.
First, we need to find our server's MAC address. Open a terminal and run ifconfig -a. The network interface we care about should have a line starting with ether, HWaddr, or lladdr. If you have multiple network interfaces (both Ethernet and WiFI for example), you can run ip route | grep default to see which one you are using.
Then, open a browser and go to your router's settings by typing the address of its default gateway (the same address that you get when running ip route | grep default). You should have a section named DHCP, Static leases or something similar. There, you are going to add a new entry, set its IP to whatever you like (in my case 192.168.1.254) and fill in the above MAC address.
You might need to restart your server and/or router, but if everything went well, you should now be able to see the line inet 192.168.1.254 next to the network interface when running ifconfig -a.
Port Forwarding
Next, we need to forward some ports to allow a direct connection from the internet to our server. Again, there's no universal guide on how to do this, so you're going to have to do a bit of digging through your router's settings.
To use OpenVPN, you need to forward port 1194 with the following settings:
- Name: OpenVPN (or anything else you prefer)
- Internal Port: 1194
- External Port: 1194
- Protocol: UDP
- Destination IP: 192.168.1.254 (or the static IP that you chose)
I have also forwarded a port for remote SSH connections (both TCP and UDP) in case the VPN goes down, but you should only do this if you have hardened your SSH server.
Custom Domain
Now that we have configured our router, it's time to get a custom domain name for our server. You could use a DDNS service like NoIP, however, most such websites place several restrictions when using the free plan, making it more worth to just rent a real domain. I personally got mine from Google Domains for about 12$ a year.
Next up, we are going to change our nameservers to Cloudflare's in order to take advantage of their caching and security features. This is not mandatory, but it's going to make it easier to fine-tune your domain's settings later on.
After getting your domain, you should create a Cloudflare account using their free tier and configure your new website. Depending on your registrar, the process of changing your nameservers will be a bit different, so you should probably follow the official guide.
Cloudflare DDNS
To create the VPN, we are going to use the docker container cloudflare-ddns to make a subdomain always point to our real IP.
You first need to create a Cloudflare API key:
- Go to https://dash.cloudflare.com/profile/api-tokens
- Click Create Token
- Provide the token with a name, for example,
cloudflare-ddns - Grant the following permissions:
- Zone - Zone Settings - Read
- Zone - Zone - Read
- Zone - DNS - Edit
- Set the zone resources to:
- Include - All zones
- Complete the wizard and copy the generated token into the API_KEY variable for the container. Make sure to note this down somewhere since you won't be able to access it afterwards.
After getting your API key, go to your Portainer instance, open the stacks tab, and add a new stack named routing. In the docker-compose field paste the following and customize to match your API key and domain:
version: '3.9'

services:
    cloudflare_ddns:
        image: oznu/cloudflare-ddns
        container_name: cloudflare_ddns
        restart: unless-stopped
        environment:
            - API_KEY=[your-api-key]
            - ZONE=example.com
            - SUBDOMAIN=ddns
            - PROXIED=false
        network_mode: bridge
Click deploy the stack and you should notice that a new A record has appeared on the DNS tab of your Cloudflare dashboard.
I have also added a couple of CNAME records pointing to the original A record specifically for SSH and VPN services: ssh.example.com and vpn.example.com.
OpenVPN
Now it's finally time to start our VPN. For that, we are going to use the kylemanna/openvpn container:
# Create a data directory for your configs
cd /mnt/storage/configs
mkdir openvpn

# Initialize the configuration files and certificates (change server URL)
docker run -v /mnt/storage/configs/openvpn:/etc/openvpn --rm -e PUID=1000 -e PGID=1000 kylemanna/openvpn ovpn_genconfig -u udp://vpn.example.com
docker run -v /mnt/storage/configs/openvpn:/etc/openvpn --rm -e PUID=1000 -e PGID=1000 -it kylemanna/openvpn ovpn_initpki

# Generate a new certificate (change CLIENTNAME)
docker run -v /mnt/storage/configs/openvpn:/etc/openvpn --rm -e PUID=1000 -e PGID=1000 -it kylemanna/openvpn easyrsa build-client-full CLIENTNAME

# Retrieve the certificate (change CLIENTNAME)
docker run -v /mnt/storage/configs/openvpn:/etc/openvpn --rm -e PUID=1000 -e PGID=1000 kylemanna/openvpn ovpn_getclient CLIENTNAME > CLIENTNAME.ovpn
After running these commands, go to Potainer and deploy a new vpn stack:
version: '3.9'

services:
    vpn:
        image: kylemanna/openvpn
        container_name: openvpn
        restart: unless-stopped
        volumes:
            - '/mnt/storage/configs/openvpn:/etc/openvpn'
        environment:
            - PUID=1000
            - PGID=1000
        ports:
            - '1194:1194/udp'
        networks:
            - vpn
        cap_add:
            - NET_ADMIN

networks:
    vpn:
        name: vpn
If everything went well, you should be able to download an OpenVPN client from one of these sources and import your certificate.
- Windows: https://openvpn.net/community-downloads/
- MacOS: https://openvpn.net/client-connect-vpn-for-mac-os/
- Android: https://play.google.com/store/apps/details?id=net.openvpn.openvpn
- iOS: https://apps.apple.com/us/app/openvpn-connect/id590379981
- Linux: use
NetworkManagerandnetworkmanager-openvpn.
Then, you simply connect to your server from anywhere in the world and access your local network as if you were at home.
Nginx Proxy Manager
By now you should be able to connect and manage your server remotely. But what happens if you want to simply open a browser, go to subdomain.example.com and access a self-hosted application? This is where Nginx Proxy Manager comes in.
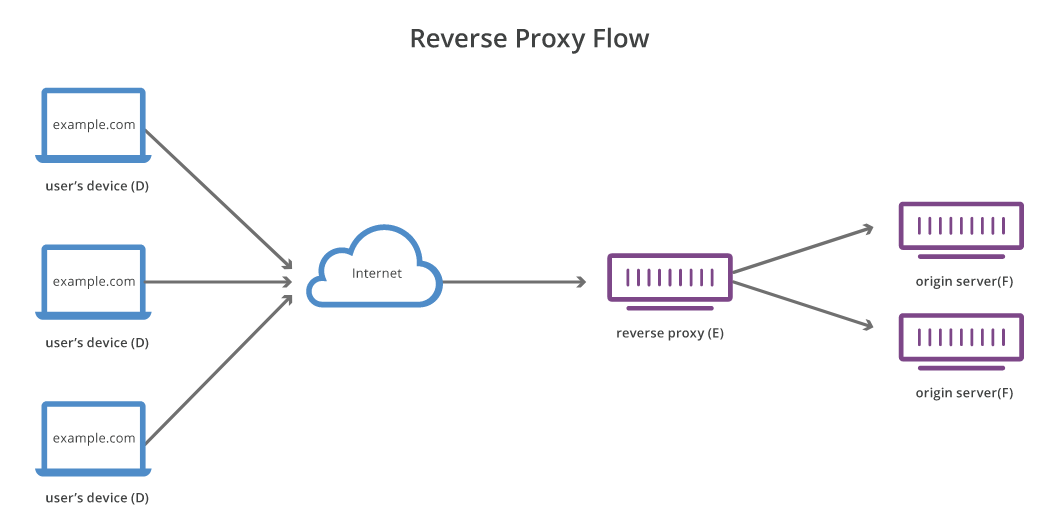
NPM, like any other reverse proxy, allows you to point all of your subdomains to itself and it will automatically manage how each request is routed. For example, both www.example.com and blog.example.com can point to the proxy's port but get routed to different local servers, one for your website and one for your blog.
To deploy NPM, we are going to use the container jlesage/docker-nginx-proxy-manager.
cd /mnt/storage/configs
mkdir routing
mkdir routing/nginx
Next, we're going to create a custom Nginx config file to change some of the default settings. Make sure to also change the Local subnets section to match your own network:
# run nginx in foreground
daemon off;

#user root;

# Set number of worker processes automatically based on number of CPU cores.
worker_processes auto;

# Enables the use of JIT for regular expressions to speed-up their processing.
pcre_jit on;

error_log /data/logs/error.log warn;

# Includes files with directives to load dynamic modules.
include /etc/nginx/modules/*.conf;

events {
	worker_connections  1024;
}

http {
	include                       /etc/nginx/mime.types;
	default_type                  application/octet-stream;
	sendfile                      on;
	server_tokens                 off;
	tcp_nopush                    on;
	tcp_nodelay                   on;
	client_body_temp_path         /var/tmp/nginx/body 1 2;
	keepalive_timeout             90s;
	proxy_connect_timeout         90s;
	proxy_send_timeout            90s;
	proxy_read_timeout            90s;
	ssl_prefer_server_ciphers     on;
	gzip                          on;
	proxy_ignore_client_abort     off;
	client_max_body_size          0;
	server_names_hash_bucket_size 1024;
	proxy_http_version            1.1;
	proxy_set_header              X-Forwarded-Scheme $scheme;
	proxy_set_header              X-Forwarded-For $proxy_add_x_forwarded_for;
	proxy_set_header              Accept-Encoding "";
	proxy_cache                   off;
	proxy_cache_path              /var/lib/nginx/cache/public  levels=1:2 keys_zone=public-cache:30m max_size=192m;
	proxy_cache_path              /var/lib/nginx/cache/private levels=1:2 keys_zone=private-cache:5m max_size=1024m;

	log_format proxy '[$time_local] $upstream_cache_status $upstream_status $status - $request_method $scheme $host "$request_uri" [Client $remote_addr] [Length $body_bytes_sent] [Gzip $gzip_ratio] [Sent-to $server] "$http_user_agent" "$http_referer"';
	log_format standard '[$time_local] $status - $request_method $scheme $host "$request_uri" [Client $remote_addr] [Length $body_bytes_sent] [Gzip $gzip_ratio] "$http_user_agent" "$http_referer"';

	access_log /data/logs/default.log proxy;

	# Dynamically generated resolvers file
	include /etc/nginx/conf.d/include/resolvers.conf;

	# Default upstream scheme
	map $host $forward_scheme {
		default http;
	}

	# Real IP Determination

	# Local subnets:
	set_real_ip_from 10.0.0.0/8;
	set_real_ip_from 172.16.0.0/12; # Includes Docker subnet
	set_real_ip_from 192.168.1.0/24;

	# NPM generated CDN ip ranges:
	include conf.d/include/ip_ranges.conf;
	# always put the following 2 lines after ip subnets:
	real_ip_header X-Real-IP;
	real_ip_recursive on;

	# Custom
	include /data/nginx/custom/http_top[.]conf;

	# Files generated by NPM
	include /etc/nginx/conf.d/*.conf;
	include /data/nginx/default_host/*.conf;
	include /data/nginx/proxy_host/*.conf;
	include /data/nginx/redirection_host/*.conf;
	include /data/nginx/dead_host/*.conf;
	include /data/nginx/temp/*.conf;

	# Custom
	include /data/nginx/custom/http[.]conf;
}

stream {
	# Files generated by NPM
	include /data/nginx/stream/*.conf;

	# Custom
	include /data/nginx/custom/stream[.]conf;
}

# Custom
include /data/nginx/custom/root[.]conf;
We also need to create a Docker network called proxy which will contain all services that will need to be routed to:
docker network create proxyFinally, open the routing stack you created earlier in Portainer and edit it like so:
version: '3.9'

services:
    nginx-proxy-manager:
        image: jlesage/nginx-proxy-manager
        container_name: nginx_proxy_manager
        restart: unless-stopped
        environment:
            - USER_ID=1000
            - GROUP_ID=1000
            - UMASK=002
            - TZ=Europe/Athens
            - DISABLE_IPV6=1
            - KEEP_APP_RUNNING=1
        volumes:
            - '/mnt/storage/configs/routing/nginx:/config'
            - '/mnt/storage/configs/routing/nginx/nginx.conf:/etc/nginx/nginx.conf'
            - '/mnt/storage:/static:ro'
        ports:
            - '80:8080'
            - '81:8181'
            - '443:4443'
        networks:
            - proxy

    whoami:
        image: containous/whoami
        container_name: whoami
        restart: unless-stopped
        networks:
            - proxy

    cloudflare_ddns:
        [...]

networks:
    proxy:
        external: true
        name: proxy
After deploying the stack, you can open a browser and go to [your-server-ip]:81 to access NPM's web UI, or [your-server-ip]:80 to test your installation. However, you still won't be able to actually use the proxy.
What you first need to do is forward ports 80 and 443 on your router, as well as go to your Cloudflare dashboard and create A, AAAA, or CNAME orange-cloud records for any subdomains you want to use.
The problem is that some ISPs block HTTP ports, making hosting your apps a bit more difficult. This is why we are going to use a Cloudflare Argo Tunnel.
Cloudflare Argo Tunnel
To create a tunnel, we need to first generate our certificate:
cd /mnt/storage/configs/routing
mkdir cloudflared
cd cloudflared
docker run cloudflare/cloudflared tunnel login
Then, follow the instructions on your terminal and save the cert.pem file at /mnt/storage/configs/routing/cloudflared/cert.pem.
Finally, edit the routing stack again and add the following:
version: '3.9'

services:
    nginx-proxy-manager:
        [...]

    whoami:
        [...]

    cloudflare_ddns:
        [...]

    cloudflare_argo_tunnel:
        image: cloudflare/cloudflared
        container_name: cloudflare_tunnel
        restart: unless-stopped
        volumes:
            - '/mnt/storage/configs/routing/cloudflared:/etc/cloudflared'
        networks:
            - proxy
        command: tunnel --no-autoupdate --origincert /etc/cloudflared/cert.pem --hostname example.com --no-tls-verify --origin-server-name *.example.com --url https://nginx-proxy-manager:4443
        user: '1000:1000'

networks:
    [...]
After deploying, you should notice a new AAAA record on your Cloudflare dashboard. If you want to use any other subdomain, you simply need to add a CNAME alias pointing to that record.
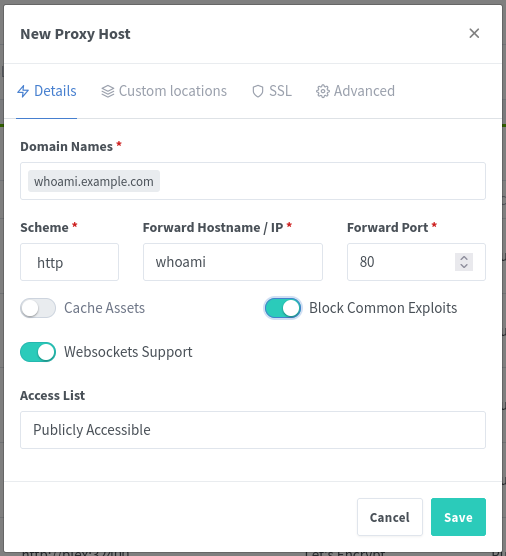
To test if everything is working correctly, add a new CNAME alias for whoami.example.com and add a proxy host in NPM with the following settings:
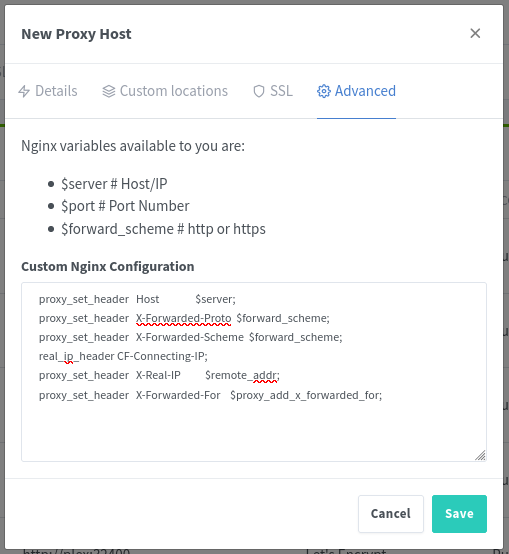
  proxy_set_header   Host               $server;
  proxy_set_header   X-Forwarded-Proto  $forward_scheme;
  proxy_set_header   X-Forwarded-Scheme $forward_scheme;
  real_ip_header     CF-Connecting-IP;
  proxy_set_header   X-Real-IP          $remote_addr;
  proxy_set_header   X-Forwarded-For    $proxy_add_x_forwarded_for;
Wait a couple of minutes for the changes to propagate and you should be able to access your new host.
Automatic SSL Certificates
The primary reason why SSL is used is to keep sensitive information sent across the Internet encrypted so that only the intended recipient can access it. One of the main selling points of NPM is automatic SSL certificate management.
In order to create a wildcard certificate for all of your subdomains, you can follow this guide by u/Sunsparc on Reddit. After creating your certificate, you should always select it, as well as turn on Force SSL and HTTP/2 Support on any proxy host you create.
Final Thoughts
After following this guide you should have your own, self-hosted VPN, as well as a reverse proxy, tunneled through Cloudflare. You can now start setting up various other services such as a Plex stack, a Grafana monitoring dashboard, or even your own personal cloud suite using Nextcloud.